Back when I started blogging, I really didn't pay attention to, well, anything when it came to my content. I wrote what I wanted. I used photos that didn't really go and weren't consistent sizes. When I was really into fashion blogging, the popular thing was to use song lyrics or quotes as the titles of your blog posts. It was so much fun trying to decide what to title my posts!
These days, with the blogging world being what it is, it takes a bit more effort than that. Even if you're just blogging for a hobby, you want to do the best you can with what you have--ultimately, if you're blogging, you want readers! And the best way to attract readers is to write great content and then ensure that you hit every point to ensure that readers can find that content.
But how can you do that? If you're like me, you work a full-time job, or you're a mom; you don't have time to learn every SEO tactic or spend hours writing posts. Well, I have 5 steps for you to follow to ensure that you can write killer blog posts with the time you have. No messing around, no fussing, no spending hours deciding what to write.
1. Take or find the perfect photo.
Humans are naturally visual people. We like art. We like photos. So your blog post should start with not just a topic, but taking or finding a perfect photo. If I don't feel like taking photos, I use Unsplash to find a stock photo that fits my topic. Then, I use Canva to create blog graphics that are uniform and use the same fonts every time. (This is the simplest part of branding: ensuring that all your images and blog graphics have the same basic look that people can recognize and associate with you. It also makes your blog look cleaner!)
2. Craft the perfect headline.
Writing headlines (or titles) for my blog posts is one of my least favorite tasks. Most people struggle with it. In my career in content/digital marketing, almost everyone I know struggles to write headlines. It's a universal issue! There are so many rules about what headlines work and what headlines don't, especially for blog posts. Thankfully, I have some resources.
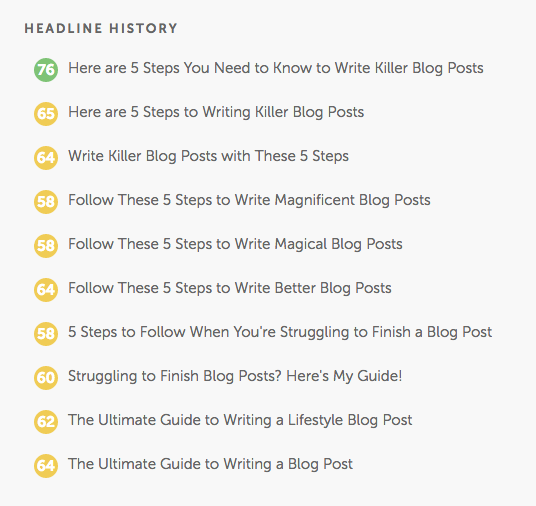
Firstly, CoSchedule's Headline Analyzer is a free tool that anyone can use (they do ask you to sign up for their newsletter, but their newsletter is very informative!) It scores your headlines using a simple algorithm for successful headlines. Here are a few I wrote for this post.
I usually like my headlines to score between 65 and 75. However, sometimes, if I am particularly tied to a title, I just ignore the score! However, using this analyzer is a great way to learn how to write headlines--so you can just go for it sometimes instead of hemming and hawing!
Here's what the breakdown looks like. CoSchedule has a great breakdown on blog post types and examples of common, uncommon, emotional, and power words here.
I usually write about 15-30 headlines for each blog post until I decide on the one.
3. Outline your thoughts.
Diving right into writing can seem like a good idea, but writing down an outline, even if it is just a rough sketch, will ensure that you stay on topic and don't get stuck halfway through writing. Even if you're not writing a blog post that features a list or steps, you can jot down all the points you want to cover. For this blog post, I wrote down the 5 steps I wanted to include, then started backwards from there to pick points for my introduction.
4. Clean up your copy.
I am a verbose person, so this is hard one for me: once you're done writing, go through your blog post and clean it up. Remove repetitive phrases. Shorten sentences. Move separate thoughts into separate paragraphs. This improves the readability of your post. (Most blog posts are skimmed anyway, so the faster you can convey your information, the better!)
5. Check for places to link other blog posts.
If you can link to other blog posts of yours (or your friends!), do it! It's worth taking a few extra minutes to add links and include a brief sentence as to why they should click over to that blog post.
BONUS: 6. Share to Pinterest, Twitter, and Facebook.
Alright, this isn't a step about writing, but it is about getting those all important readers. None of us like talking to thin air, that's for sure! I share my blog posts automatically via Squarespace with my chosen hashtags. I then make sure to pin daily to Pinterest, as well as to my group boards on Pinterest. If you use Facebook, share your post there too; Facebook is the number one website for referral traffic.


