Sponsored

How to Protect Your Eyes from UV Rays in the Winter

How to Protect Your Eyes from UV Rays in the Winter | Writing Between Pauses

I recently partnered with Visionworks to promote the new location at the Valley River Mall in Eugene, Oregon. That’s my hometown mall! I’ve been going to Valley River Center for as long as I can remember and having a handy place for all my vision care needs, alongside all my other favorite places to shop, is a huge bonus.

I’ve needed glasses since I was about 12. When I first got them, I refused to wear them for nearly two years—until I started driving and my mom agreed I could wear contacts. I wore contacts until around 2015, when my eyes became more sensitive while I was pregnant. I wear glasses all the time now, so keeping my prescription up to date and my eyes healthy is really important to me. As well, as a chronic migraine sufferer, keeping an eye on my, well, eyes is also hugely importance; how my glasses fit, how the lenses reflect light from my computer, and how tight they are can have a huge impact on my migraines!

One important aspect of eye health that we often forget is protecting our eyes from UV rays. We tend to think of sunglasses purely in terms of fashion or helping us see. I always wear sunglasses when I’m driving in the summer, but during the winter, I definitely lapse in that habit. The days can be so dark, we forget that UV rays can still damage our eyes and our skin. (Which is why you should wear SPF every day!)

I wanted to share a few tips for protecting your eyes from UV rays in the winter!

  • Even on cloudy or hazy days, UV rays can damage your eyes. If you’re going to be outside, wear UV blocking sunglasses and broad-brimmed hats (as well as SPF on your face and any visible skin).

  • Don’t forget your kids when wearing sunglasses and hats!

  • Snow and ice can reflect UV rays—which is why sometimes, even on cloudy days, it can still feel really bright! As well, these reflected UV rays can be even more harsh than usual. Wearing polarized sunglasses while driving in snowy & icy conditions, or while skiing or playing outside in the snow, can feel dangerous, but will help you protect your eyes and see more clearly.

You might be asking: why do my eyes need protection from UV rays? UV rays cause damage to your eye—just like your skin. This can cause cataracts to develop, as well as other degeneration issues.

And in terms of vanity, frequent squinting can contribute to both headaches and wrinkles. All that eye cream, just to squint while outside in the snow?!

Thankfully, there are lots of options for stylish and functional eyewear to protect your eyes. Different activities call for different protection. If you ski, a pair of polarized ski goggles can protect your eyes. If you travel frequently, a great pair of sunglasses fit the bill. Visit Visionworks to check out their selection—and visit your nearest location for an eye exam and to try on glasses and sunglasses!

Disclaimer: as indicated by the asterisk (*) in the title of this post, this is a sponsored post with Visionworks. All opinions, however, remain my own. To learn more about my disclosure policy, click here.

Beauty Review: Mériance Anti-Aging Skin Care Kit*

Beauty Review: Mériance Anti-Aging Skin Care Kit | Writing Between Pauses

When I received an email a few weeks ago from Mériance asking if I would like to review their full anti-aging skin care kit, well, I couldn’t say no.

As you all probably know, I turned 30 in October. And while I’m not showing any signs of aging (at least in my skin), I’m a big believer in taking care of my skin to keep it looking good. For me, that has meant double cleansing, wearing my SPF every single day, and keeping moisturized. I tend to shy away from longer, more complicated routines. The Mériance Anti-Aging Kit seemed right up my alley!

I received my kit a few weeks ago. Here’s everything that’s in it:

  • Rejuvenating Serum

  • Native Collagen Serum

  • Anti-Aging Collagen Cream

  • Night Repair Cream

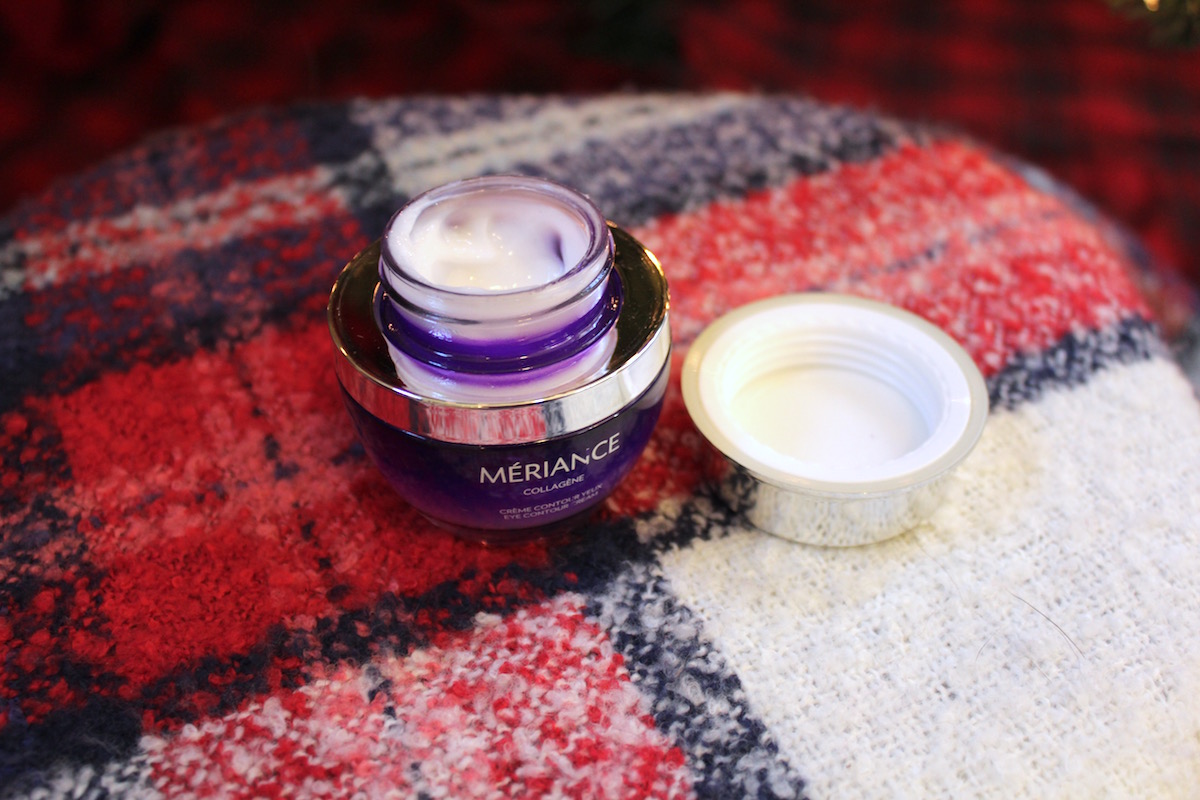
  • Eye Contour Cream

And here’s what the kit, and all the products, promises:

Meriance bio-active collagen derived from marine origin replenishes the skin with properties that enhance the supply of collagen fibers. Meriance collagen is not modified or synthesized! It regenerates the connective tissues that support the skin’s structure. This ingredient helps to deeply hydrate mature and dry skin in order to maintain healthy and resilient cells.

My favorite thing about this kit is that you get just about everything you need for a routine. So while the cost upfront might be a little shocking, these are full sizes, you don’t use that much every single day, and you get everything you need. The order to apply everything is really basic too. Here’s what I do:

  1. Double cleanse with jojoba oil, then the Body Shop’s Tea Tree facial cleanser.

  2. Apply the Rejuvenating Serum, which contains peptides. It helps to enhance the other products in the kit. It has hyaularonic acid, which helps plump skin.

  3. Apply the Native Collagen Serum. It has a high concentration of collagen.

  4. At this point, I use the Eye Contour Cream mixed with a tiny amount of my favorite vitamin C cream (right now, I’m using Revlon’s). I only use this around my eyes to help with my melasma and moisturize the skin underneath my eyes. I let that sink and dry for about 5 minutes.

  5. Apply the Anti-Aging Collagen Cream. This is a thick, lovely moisturizer that smells really good and feels even better! I’ve been struggling with dry patches since Thanksgiving and this really clears them up within a few days.

  6. Apply the Repair Night Cream. This is a double dose of moisture that I use after the Collagen Cream. It contains antioxidants that can help adjust repair your skin.

Meriance Anti-Aging

Results

How quickly did I start seeing results? As I said, I struggle with dry patches once late Fall and early Winter hits; usually my nose and cheeks are where I struggle the most, but this year, my under eyes have decided to join in on the dry skin party.

I haven’t used everything enough to speak to the anti-aging effects quite yet, but I have noticed that my skin has been much softer, much less textured, and much more “supple” feeling (for lack of a better word). My dry patches have been much less severe and as long as I’m good about applying both the Collagen Cream and the Night Repair Cream, they are much less noticeable, and even not there at all, throughout the day!

As someone who is acne prone, I’m always really worried about trying new products. However, acne-prone skin is dehydrated skin and these products have been helping so much! I’m getting less oily throughout the day now that my skin is being better moisturized every morning and night.

If you have dry skin or are beginning to worry about aging, this is definitely a kit you want to pick up! I have a special coupon code just for my readers for $100 off your first kit. Just click the image below, or click here, and use code MichelleLocke100 at check out!

Disclaimer: As always, an asterisk (*) in the title of this post indicates that I received this product in exchange for review. However, my views remain my own! Posts like these help me keep the lights on here at Writing Between Pauses. For more information about my disclosure policy, click here.

Product Review: Maxwell USB Floor Lamp from Brightech*

Product Review: Maxwell USB Floor Lamp from Brightech* | Writing Between Pauses

A few weeks ago, I got an email from Brightech** asking if I'd like to test out one of their lamps.

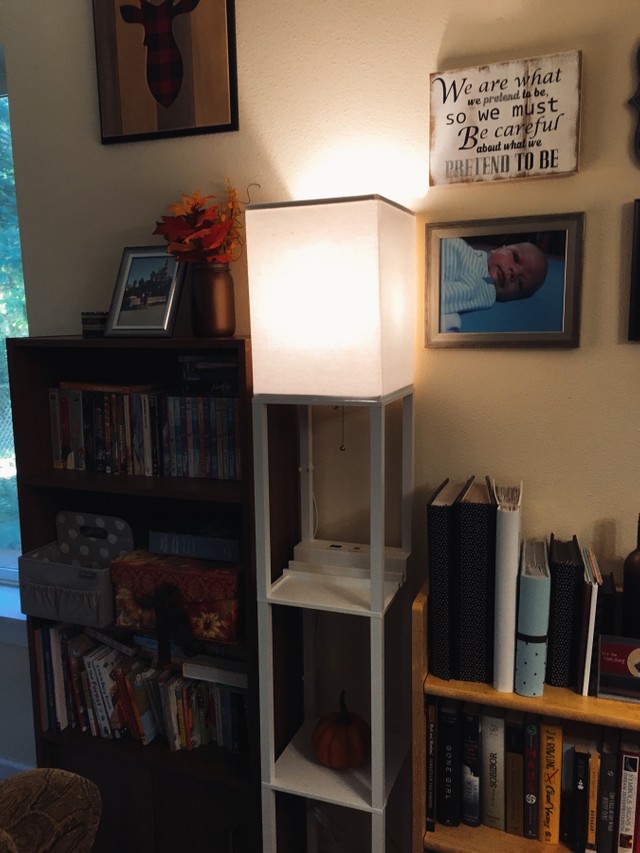
Home decor is one of those areas I really love, but with a toddler, is one of the areas of my life where I feel everything is severely lacking. We still have a combination of college leftovers (the two bookshelves in my photos are both hand-me-downs that I had in my apartment in college!), hand-me-downs, and things purchased purely out of need, rather than aesthetic design. 

We have recently been trying to clean up our house and get rid of our mish-mashed furniture. Our dining room table finally matches our china cabinet, for example; our entertainment center in the living room is finally a functional piece of furniture, rather than something that was falling apart. It has been a slow and steady process, mainly because we don't really have the money to buy all new furniture! 

One thing we needed in our living room was some kind of additional lighting--which is why that email from Brightech felt very serendipitous! 

With a toddler, we don't like to have table lamps, as they can be easily pulled down (and the more cords we have, the more problems). We wanted to get a floor lamp that we could eventually transition to another part of our house or repurpose later on. 

So, that's what led me to pick the Maxwell USB Floor Lamp** in white from Brightech. 

I haven't mentioned this much, but Danny and I are going to be moving in about a year's time to a new house. I know, I know... it's very overwhelming. So everything we have right now isn't forever. We chose the Maxwell USB Floor Lamp with the intention of having it in our living room for a bit of extra light in the mornings; Forrest wakes up at 5:30 or so every day and our overhead lights are very bright. Not a gentle wake up for anyone! The Maxwell gives us a good bit of light while also being very functional. 

In the new house next year, I plan to put the Maxwell lamp in my office; I already have a vision for what I want my new office to look like (yes, I'll get my own dedicated office!) and the Maxwell fits in perfectly. I like that it can be both incredibly functional and part of the design of a room itself. 

Right now, I don't love where I have it in our house; however, again, with a toddler who is running at top speed with little foresight to something like cords, we didn't want to have it beside our couch (where I originally wanted). I knew that Forrest would trip on it!

Brightech Maxwell lamp
Lamp with USB Charger

However, my favorite part about is the USB charging ports on the top. There is a plug in, which means I can use it for some Christmas lights in the next few months; there are also USB ports for cell phone chargers. This makes it super handy to listen to podcasts or books while folding laundry, cleaning the living room, or just playing with Forrest. 

Brightech has lots of great lamps that are just as beautiful and functional as the Maxwell; they eve have a great selection of string lights**. When we move into our house next week, we have some big plans for a backyard and I'm really excited to get some Edison lights**. 

Even better, shipping from Brightech was fast (like, really fast) and assembling the lamp went really easy as well. Putting together furniture is always a test of a marriage and we didn't fight once while putting together the Maxwell. If that's not a testament to good instructions, I don't know what is! 

If you're looking for great, functional and beautiful lighting, I can't recommend Brightech** enough! 

Disclaimer: As usual, an asterisk (*) in the title of this post indicates a sponsored post. I received the Maxwell USB Floor Lamp from Brightech in exchange for review. However, all opinions remain my own! As well, links marked with a double asterisk (**) throughout this post are affiliate links, which means I receive a small commission for any purchases through that light. This helps me keep the lights on here at Writing Between Pauses! For more information about my disclosure policy, click here

Why I Made the Switch to An Electric Toothbrush*

Why I Made the Switch to an Electric Toothbrush* | Writing Between Pauses

Back in April, I shared my experience with Smile Brilliant’s teeth whitening kit. As someone with sensitive teeth, whitening always seemed a little out of reach for me! Most whitening kits just made my teeth more sensitive, but I loved how Smile Brilliant helped whiten my teeth and didn’t make my teeth more sensitive.

There are so many ways my sensitive teeth kept me from trying new things when it came to my routine. One thing I’ve been slacking on for years is brushing my teeth. I was a dedicated user of standard, cheap toothbrushes. I knew electric toothbrushes were more beneficial, especially for someone like me, who struggled with prenatal and postpartum gingivitis, but they were too much for my teeth and I worried about making all my sensitivity issues worse.

So when Smile Brilliant asked me to try out their new electric toothbrush, the cariPRO**, I was a little hesitant. But Smile Brilliant had given me a whiter smile with their sensitive tooth whitening kit--so I trusted them!

Using the cariPRO

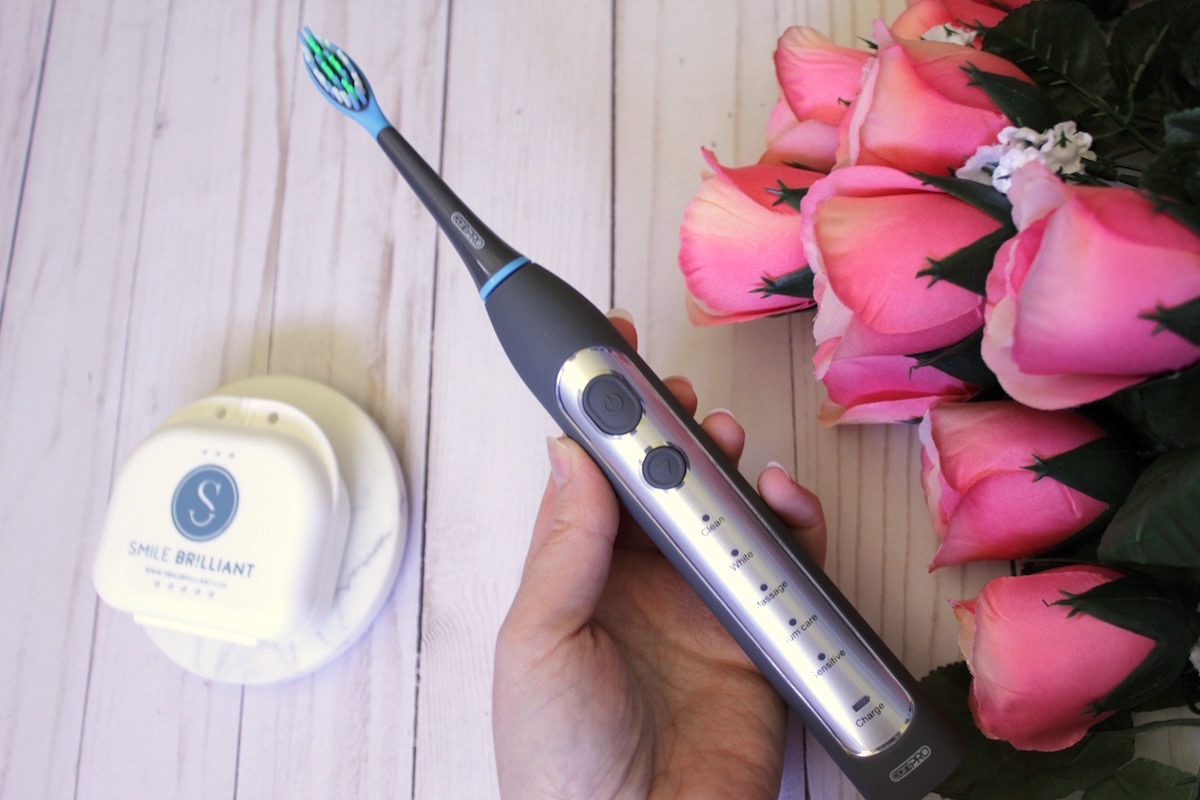
Using the cariPRO* toothbrush from Smile Brilliant

The first thing I did when I received my cariPRO was test it out! I was so excited to try it out and see if it would actually work for my sensitive teeth.

The cariPRO has 5 different settings: Clean, White, Massage, Gum Care, and Sensitive. They all have different vibration speeds and patterns.

The Clean setting is a standard setting; White bumps up the vibration to help really get rid of surface stains; Massage and Gum Care are designed to massage your gums and teeth as you brush, getting rid of plaque and stimulating your gums; and Sensitive is like the Clean setting, but dialed down.

Over the first few days of using the cariPRO, I tried all these settings. The best part about the cariPRO is that it pauses every 30 seconds--which reminds me to switch from the four “corners” of my mouth. Isn’t that genius!? Not only is the cariPRO better for your teeth and gums, it helps you brush your teeth for the amount of time recommended by dentists.

My favorite routine was to start on the Sensitive setting and brush for 2 minutes that way, then switch to White and brush the fronts of my teeth for 1 minute. It really helped give me that sparkling, clean feeling and alongside my ongoing whitening with Smile Brilliant, I’ve noticed my teeth are much whiter and cleaner feeling. Once a week, I also spend 2-3 minutes using the Gum Care setting to massage my gums. (And of course, every day when I’m done brushing, I follow up with flossing and mouthwash!)

What’s it come with?

the cariPRO electric toothbrush from Smile Brilliant*

I received the Individual Package of the cariPRO from Smile Brilliant**; this came with the toothbrush, two heads, and the charging dock. At only $119, that’s a great deal! You can also order extra heads for the cariPRO really affordably; a set of 2 is only $13**.  All the packages come with a 2 year limited warranty; that means they’re committed to getting you whiter, healthier teeth.

Right now, my readers can get 20% off their cariPRO order using the code writingbetweenpauses-20. That’s 20% off on top of the already amazing price; if you order the individual package, it will only be $95.20!

Just visit Smile Brilliant** and enter writingbetweenpauses-20 at checkout!

We all want to be our best possible selves. A beautiful smile is often the first thing we notice about other people--and we all want our smiles to be bright. And even better, we want our dentists to be impressed by our tooth health. I’ve noticed a definite improvement in my teeth since starting to use the cariPRO in July and I know you’ll love it too!

If you have any questions about the cariPRO and Smile Brilliant, check out their FAQ here**; it answers all their most common questions. And don’t forget to use writingbetweenpauses-20 at check out!

Disclaimer: As always, the asterisk (*) in this blog post indicates that I received the cariPRO toothbrush from Smile Brilliant for free in exchange for review! All opinions, however, remain my own. As well, any links marked with a double asterisk (**) are affiliate links; that means, I get a small percentage for every sale that occurs through those links. If you want to try the cariPRO or the tooth whitening kit, both of which I absolutely love, please consider using my affiliate link and discount code! It helps me keep the lights on here at Writing Between Pauses. 

Beauty Review: Maybelline Shine Compulsion*

Beauty Review: Maybelline Shine Compulsion | Writing Between Pauses

There are few things as exciting as a new lipstick. I suspect that if you're reading this blog post, you can absolutely relate. New lipsticks are full of possibilities. Even if you, like me, tend to buy the same color over and over (shout out to dusty rose shades), there is always a question of whether it's going to look as good as you hope it will. 

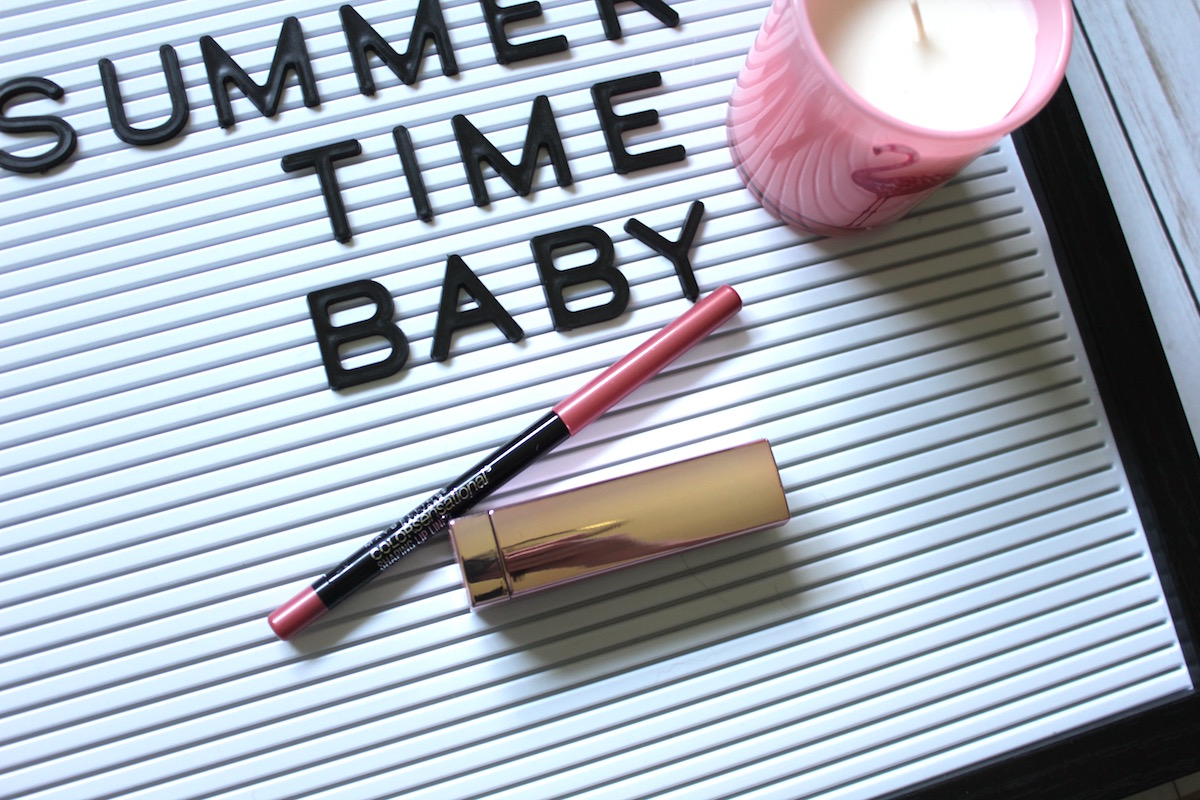
When I received this Mabelline Shine Compulsion lipstick (and ColorSational Lip Liner) in the mail from Influenster, I was so excited to try it. I love lipstick. It's probably the thing I most look forward to picking out in terms of my makeup (especially as I've been rocking neutral eyes & winged liner lately). I received the color Undressed Pink, as well as the lip liner Pink Wink. Here's what Maybelline has to say about these new lipsticks: 

Shine Compulsion Lipstick is Maybelline’s most brilliant lip color - get loads of hydration, vibrant color, and an ultra-shiny finish.

Well, color me intrigued!

Recently, the trend has been shifting from matte lips to a more glossy finish. Having lived through the gloss-soaked 2000s, I can't say I'm exactly excited. There was nothing worse than getting your hair stuck in your super glossy lips--then having both ruined your lip gloss and coated part of your hair in it too! Plus, gloss requires more application and honestly, I'm pretty lazy when it comes to lipsticks. 

Let's dive in to my thoughts about this lipstick though, shall we? 

Maybelline Shine Compulsion in Undressed Pink

I'll be completely honest: the moment I opened this lipstick and looked at the shade I'd received, I was pretty disappointed. I quite like pink lipsticks, but this one struck me as a bit too... baby pink. The first time I applied it, I stood in the mirror and grimaced. My husband walked in and asked me if everything was ok. 

"Do you like this lipstick?" I asked. 

He paused, tilted his head, and then said, "It looks a bit like the one your grandma wears." 

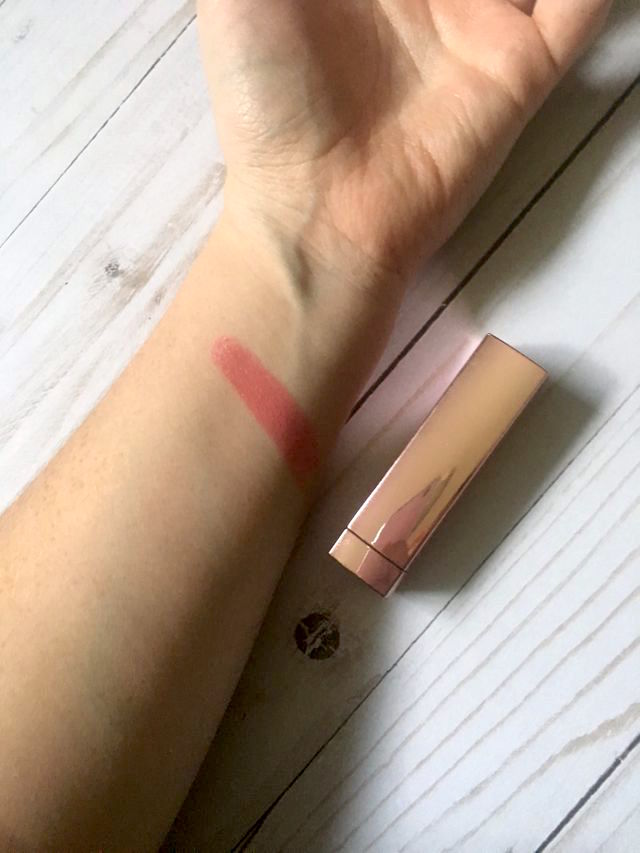
Yes, that's it exactly: I swear it's the exact shade my grandmother has been wearing for 40+ years. It is frosted and extremely shiny. The formula is lovely, very smooth and hydrating. I don't know if it is just this color, but there is a slightly frosty, almost metallic tint. I vowed to try to make it work, though. 

I will say, if your lips are chapped, just like with liquid lips, this lipstick won't look great on the first application. It can be a bit streaky and uneven from the amount of oil in the lipstick, so moisturizing and exfoliating beforehand is important. 

In this photo: Shine Compulsion Lipstick in Undressed Pink over Colorsational Liner in Pink Wink.

In this photo: Shine Compulsion Lipstick in Undressed Pink over Colorsational Liner in Pink Wink.

In this photo, Colorsational Lip Liner in Pink Wink topped with Wet'n'Wild Liquid Catsuit in Coral Corruption. 

In this photo, Colorsational Lip Liner in Pink Wink topped with Wet'n'Wild Liquid Catsuit in Coral Corruption. 

The lip liner I received is actually darker than the lipstick itself. Pink Wink is an almost mauve-pink liner. I decided to line my lips with this and fill in about 2/3 of my lips, then applied the lipstick just directly in the center. I have to say: I much prefer the lipliner to the lipstick! It's creamy and smooth, applies like a dream, and has major staying power. I'll probably wear it on its own, to be honest! I preferred this look to just the lipstick; it toned down the frosted nature of the lipstick and gave me the most staying power (though I still had to reapply after eating or drinking anything). You can see this look on the left. 

I decided to experiment with the liner and see if it would tone down some of my brighter lipsticks. I lined my lips and filled in the outer 1/3 with Pink Wink, then applied Wet'n'Wild Liquid Catsuit in Coral Corruption, one of my favorite liquid lips, but this shade is a bit too orange-toned for me. However, the lip liner gave it a bit more pink and I loved the result! I'd wear this look again in a heartbeat. This look is on the right. (And I promise, I do wear more things than a gray sweatshirt. I just happened to be wearing the same sweatshirt on both days!) 

Undressed Pink
Maybelline Shine Compulsion in Undressed Pink Swatch

Is this my absolute favorite lipstick? No. But are there ways to make it work? Absolutely! I'm a bigger fan of the lip liner I was sent than the lipstick itself, but I'm going to experiment with blending it into some darker lip liners to see if that can allow me some different looks. As well, I'm very excited to keep experimenting with the lip liner to even out some of my more difficult lipsticks.

Disclaimer: As mentioned, I received this product in exchange for an honest review from Influenster. However, all opinions remain my own. Taking sponsored posts and complimentary products like these help me keep Writing Between Pauses going! To learn more about my disclosure policy, click here

Beauty Review: Chic Voxbox*

Beauty Review: Chic Voxbox* | Writing Between Pauses

Another month, another Voxbox! I love receiving voxboxes, but sometimes, especially the ones that include multiple products, can feel a bit random. Does anyone else feel that way? 

This month, I received the Chic voxbox. (I'm still not sure why it's called the Chic voxbox... these products are not high end. In fact, All of these items are under $10, except for the full size of the face mask. But c'est la vie, I'm not working their marketing department!) 

If you don't use Influenster, it's a great time to start! (You can view my profile here.) Influenster is a website where you can review products, answer questions about products, and take surveys to receive products to review. I've gotten a ton of products through Influenster and I've loved a lot of them. (Click here to read about my Uniquely J voxbox and click here to read my Foot Petals voxbox review.) 

Here's everything I received in the Chic voxbox: 

  • eos: evolution of smooth Sensitive Skin Shave Cream ($3,99, full size) 
  • NYX Worth the Hype Volumizing and Lengthening Mascara ($8.99, full size) 
  • KORRES Pomegranate AHAs and Enzymes Resurfacing Mask ($34 for full size) 
  • Hair Food Moisture Shampoo & Conditioner ($9.99 for full size) 

That's a lot of stuff, but most of it is sample size. I have no issue with deluxe sample sizes (like the KORRES mask). I do take issue with receiving packets of shampoo and conditioner as samples; plain and simple, using it once is not enough of an idea of how good it is. However, I'll do my best to review. Let's jump to it then! 

eos Sensitive Skin Shave Cream

This is a full size product, which is always quite exciting to receive. However, I don't typically use shaving cream; I usually use hair conditioner (multi purpose!) or just soap. What does this shave cream promise? 

Formulated especially for sensitive skin, with botanical ingredients to soothe and deeply moisturize skin and no added fragrance. A unique, skin-friendly and super-smooth Shave Cream for Sensitive Skin to moisturize and soothe with aloe and wild oats, lavender butter and no added fragrance.

 Well, that does sound nice, doesn't it? 

It's true that this shave cream doesn't have any added fragrance--an added bonus, especially if you have sensitive skin. It's not the texture of the average shaving cream, really; it's more like a very thick lotion. I found it clogged up my razor really badly, and I found it quite annoying to have to rinse so often. But it did make my legs feel quite soft and smooth. Since it's only $3.99, I could definitely see myself repurchasing--but a single tube will probably last me quite a while! 

NYX Worth the Hype Volumizing and Lengthening Mascara

I'm a huge fan of NYX products, so I was excited for this one! I'm not much of a mascara fan; I have a hard time finding mascaras that work for what I want. This mascara is really no different than the other mascaras I own, but I do like how dark black it is and the brush is my favorite kind of brush. Here's what NYX has to say about it: 

This buildable formula actually does what it promises! Get up to eight times the volume with darker, fuller lashes!

Well, it does give you darker lashes. But like most volumizing mascaras, I find that that tends to translate to "clumpy." It's not a bad mascara, but it's definitely not anything worth writing home about. But for $8, it is quite nice. 

KORRES Pomegranate AHAs and Enzymes Resurfacing Mask

We have to talk about this mask. Mainly, it's not a mask... it's a scrub! The instructions say to only leave it on for 2-3 minutes... that's not a mask. That's just forgetting to rinse your face wash. Let's look at the promises, shall we? 

A natural resurfacing face mask powered by glycolic acid and pomegranate grains and extracts to purify the skin and minimize the appearance of pores.

Those are... some promises! I had to pop over to their website to see what else they promised. Check this out: 

Customer Panel (in one use): 97% Improvement in Skin Texture. 100% Reduction in the Appearance of Pores and Balance of Sebum. 100% Improvement in Skin Smoothness and Skin Tone.

100% reduction in appearance of pores? And 100% improvement in skin smoothness and tone? Ok. Well. 

I'm here to tell you that I don't think that's true. This glorified face wash is quite nice. It smells incredibly strongly of fake pomegranate fragrance (you heard me) and it contains small shells which I can only assume are pomegranate shells. It made my skin feel soft. Did it do anything? Not really. My pores didn't look smaller. I don't scrub my face, so it did nothing to my texture. And the tone of my skin remained the same. It's a nice face wash, but it's not a mask and it's an absolute "yikes!" moment to read those promises! 

Hair Food Moisture Shampoo & Conditioner Infused with Honey Apricot Fragrances

I hate to say it, but these were my favorite items in the box! As I've written about a truly embarrassing amount, I've had a problem with an itchy, dry scalp the last 4-5 months. It's been a major struggle. I really wanted to hate this shampoo and conditioner because they are not cruelty-free products... but if this isn't the best my scalp has felt in months, I'll eat my own socks. My scalp is not itchy at all! My scalp looks great! No flakes! And my hair is silky and shiny. 

Let's look at what they have to say: 

Hair Food’s line of shampoos and conditioners is inspired by nutritionists and crafted by hair experts to nourish your hair without parabens or mineral oils.

That's absolutely fair. I feel like this shampoo and conditioner does do those things. I am actually planning to buy full sizes of these to keep testing out and see if maybe it's just a fluke that it helped my scalp so much. (I genuinely need to know!) 


Did you receive the Chic voxbox? Or have you used any of these products before? What do you think? 

*Disclaimer: as denoted by the asterisk (*) in the title of this post, I received these products in exchange for review. However, thoughts remain my own! You can read more about my disclosure policy here.

What Made Me Change My Mind About eSalon?*

What Made Me Change My Mind About eSalon? | Writing Between Pauses

Back in January 2017, I wrote a post about eSalon* (you can read that original post here). I didn't know it at the time, but that blog post would single-handedly drive most of my traffic for the better part of a year. I'm not joking! It's one of my most popular posts to date. 

My original experience with eSalon was not great. I was left disappointed and, honestly, a little sad about my hair color for a while. To recap, when I originally ordered from eSalon, I selected a color called Intense Pearl: a very dark brown with violet (aka cool) undertones. After I dyed my hair, my hair was dark brown with very bright red undertones. Definitely not what I was looking for, but it also wasn't the worst thing to happen to my hair. I was disappointed, mostly because there was little they could do in terms of formulation to fix it. 

After I wrote that post, I started getting referral credits from eSalon. Despite my not-so-great review, people used my referral link. This left me in a bit of a crunch: do I order more hair dye? Do I try again? 

I decided to go for it. What's the worst that could happen? I chose a plain brown close to my natural color (Chocolate Brown) and ordered. 

That was just about a year ago. I've been dyeing my hair Chocolate Brown every 8-12 weeks ever since. 

Shortly after the original first order, when my hair ended up dark red, I told my friend I would never order from eSalon again. 

Obviously, that wasn't the case. I did order from eSalon again--multiple times, actually. Recently, I started thinking about what made me change my mind. That second order, in April 2017, was made hesitantly, but as time has gone on, my opinion of eSalon has shifted. What made it change? 

And, more importantly, why do I sing the praises of eSalon to nearly every person I know? 

eSalon | Writing Between Pauses

1. Hair Color is Personal

The thing about hair color is that it's so intensely personal. Most people have very strong feelings when it comes to their hair color: they want it to look a very specific way. Some people exclusively have their hair dyed in a salon, because it's what they know. And some people, like me, are more comfortable with box dye. I grew up watching my mom dye her own hair (and my mom has dyed my hair a lot). 

That's the thing about eSalon. I feel like they combine the best of both worlds: the fun of dyeing your hair at home (it really is fun!) and the confidence of having it done in a salon. You can get exactly what you want, with perhaps a little tinkering. 

2. The Quality (& Supplies) Make Dyeing Your Hair an Experience

eSalon 2 | Writing Between Pauses

In my second review of eSalon (you can read that one here), I talk about how I don't think eSalon's quality is much better than a box you can buy at the grocery store. 

I was still feeling pretty wounded by my original experience there. But I'm going to have to eat my words now: the truth is, eSalon's quality is, like I said, better than box dye. That's just a fact: I don't experience the same issues with eSalon as I always did with box dye. It's just a better product. 

But beyond that, what you receive in your kit from eSalon is enough to make you switch! Not only do you receive your color (developer + color), you get a box of gloves (two pairs, one for dyeing and one for the shower, which is so handy; plus, these gloves actually fit your hands, instead of being those huge papery ones) and a box of shampoo, conditioner, stain guard, and stain remover. You don't get all that with a box of dye from the grocery store. 

Everything is just of a higher quality: good gloves that fit well, good shampoo and conditioner, and an amazing stain remover. Dyeing my hair is a relaxing activity that I really enjoy, so I like to make a process of it. I even have a color kit that I bought from eSalon, with a non-skid bowl, hair clips, and a brush. That's how much I enjoy dyeing my hair these days! 

3. Customer Service

My original experience with eSalon is everyone's worst fear, isn't it? You order some hair dye, you dye your hair, and it's... not what you wanted. It's not right! It makes everyone feel a bit panicky, because, as I said, hair color is intensely personal. It's also not something you can hide very much! And if you start where I did (postpartum, with my hair my natural color and very healthy), it can feel like a bit of a punch in the gut. 

eSalon tries to make it right though. I didn't take them up on their original offer to send me a new hair color; I was just too nervous! But they were more than willing to explain themselves regarding my original color and to try and make it right--and that's something anyone can really appreciate. If your color doesn't turn out how you want it to, they do what they can to change it or give you a refund.

Why Should You Try eSalon? 

I know what you're thinking: Michelleyour first experience made you so unhappy. Did you really change your mind or are you just saying this? Nope, I'm not just saying it! I genuinely love ordering from eSalon, look forward to my eSalon box, and really look forward to coloring my hair every two months or so. If you dye your hair frequently, you probably already know how to use box dye; and eSalon is a step above that. 

If you'd like to give eSalon a try, click here to try it out**.

*Disclaimer: a noted by the asterisk (*) in the title of this post, this is a sponsored post from eSalon! However, all thoughts are my own. The double asterisk (**) on links, as always, marks that these are affiliate links; I will receive a small kickback from eSalon if you place an order. This helps me keep Writing Between Pauses running. To read more about my disclosure policy, click here

How to Whiten Sensitive Teeth and Build Confidence in 2 Weeks*

smile brilliant sponsored post (1).png

When I was pregnant with Forrest, I felt more confident than I ever had before. I loved being pregnant, even though I later found out that I was having what is often thought of a difficult pregnancy. (In my defense, if you have nothing to compare pregnancy to, it's hard to know if it sucks or not!) 

It was after I had Forrest that I started to feel really less-than-confident. Not only had my body been radically altered, but I felt like my entire face was different! I got very puffy during pregnancy and, even in the weeks that followed, I continued to look quite puffy and bloated. 

During pregnancy, I developed prenatal gingivitis. This is extremely common and is almost always something you can't really prevent from happening; I'd never had issues with my teeth before and I took extremely good care of my teeth. But my smile was affected by pregnancy, no matter how well I took care of my teeth. 

I worked really hard postpartum to improve my dental health--and I'm glad to say I don't have gingivitis anymore, thankfully! But my nervousness over my teeth, and how they look, had taken its toll. I knew I needed to try to gain some confidence back when it came to my smile. 

Enter Smile Brilliant. I had tried other tooth whitening systems in the past but found them cumbersome or so mild that they had no effect. I also didn't have the money to pay for professional whitening at my dentist's (trust me, I asked). So when I heard about Smile Brilliant, I knew I wanted to try it. And thankfully, the process is super simple! 

The Process

The Process - Smile Brilliant

Your first whitening kit comes with supplies to make tooth impressions, plus all the whitening and desensitizing gel you'll need for later. I had so much fun doing my impressions for my trays; I know that sounds dorky, but mixing up the base and catalyst was really fun. You just mix them together and press into the blue tray, then press onto your top or bottom teeth. (Then repeat for whichever ones you didn't do!) Once you've done your impressions, you let them dry and mail them back to Smile Brilliant, where they make you a set of your own, customer trays

That's really the secret to Smile Brilliant: these aren't generic trays or strips that might not fit on your teeth. Because they fit so well, it's easier to get an even whitening on your teeth! The process is so simple and fast; it felt like it took barely any time at all!  

But Does It Work?

Before and After | Writing Between Pauses

Once I got my trays, I was so excited to start! Since I received a sensitive kit (as I have quite sensitive teeth), I first use the whitening gel for about 30 minutes. I then use the desensitizing gel for 25 minutes. Within my first week of use, my husband commented on how much brighter my smile looked. If that's not a compliment, I don't know what is!

I used Smile Brilliant every night for about 10 days to achieve these results. I took a break after 10 days (and I'll talk about why in a little bit) and then started whitening every other day after that. On the days after I whitened, I tried to avoid anything that might heavily stain my teeth, like tomato sauce or coffee (that was a tough one). 

I'm really, really happy with my results. I bought a lavender lipstick a while ago that I absolutely love--but when I smiled, it made my teeth look so stained! I had pretty white teeth before, but that lipstick made them look dingy. I'm excited to try it again now that my teeth are brighter and whiter. There is nothing like having a brighter smile that makes you feel more confident about your appearance. 

A Few Notes

After 10 days, I experienced something that is known as "blanching": basically, I burned my gums with the whitening gel. The Smile Brilliant instructions are really specific about how much gel to put in my trays--but I had accidentally added a bit more than usual and thought, "It will be fine!" It wasn't fine. Within 5 minutes, my gums on the left side of my mouth were burning. I took it off and rinsed, then wore the desensitizing gel for about 15 minutes in the hope that it would help. My gums were fine within 24 hours, but it was a big lesson: follow the instructions! 

As I said, I have quite sensitive teeth, so I received a sensitive kit from Smile Brilliant; the desensitizing gel is an important step if you have more sensitive teeth because it helps bolster your teeth back up some you don't damage them. 

It goes without saying that if you want to try a whitening kit like Smile Brilliant, you should speak to your dentist first. I just gave my dentist a call and talked to him about it; he checked out the website and gave me the ok, with a reminder to follow their instructions and not go overboard.

Try It Yourself! 

I loved whitening my teeth with Smile Brilliant. To enter to win a credit for a Smile Brilliant kit, click here. You have 7 days to enter; this giveaway is open to USA, UK, Australia and Canadian residents. 

If you'd like to try Smile Brilliant, click here to purchase your own kit** and use coupon code WRITINGBETWEENPAUSES15 for 15% off! 

Disclaimer: As always, an asterisk (*) in the title of this post indicates that this is a sponsored post. I received my Smile Brilliant whitening kit for free in exchange for review from Smile Brilliant. However, all opinions are my own. As well, affiliate links are marked with a double asterisk (**); I do receive a small commission for any orders placed through these links. It helps me keep Writing Between Pauses running! To learn more about my disclosure policy, click here