Blogging

Feeling Stuck? Here Are 10 Blogtober Ideas

Feeling Stuck? Here Are 10 Blogtober Ideas | Writing Between Pauses

Are you a blogger? Are you taking on Blogtober this month?

Thinking up 31 topics for blog posts throughout the month can be a huge challenge. My advice is always to plan your content in advance, work ahead as much as you can, and take shortcuts whenever possible (like using stock photos when you schedule your posts, but add in your own photos later if you want to).

I wanted to share a few topic ideas for when you’re feeling really stuck for content this month--whether you’re doing Blogtober or not! Many people modify Blogtober: instead of posting every day, they post every other day, or just more regularly than usual. It’s up to you, and I hope you find these ideas helpful!

For Lifestyle Bloggers

1. Daily Diaries

These used to be such popular blog posts--back when people used blogs essentially as journals! It is so fun to do day-in-the-life posts occasionally and an autumn version would be really fun.

2. Things I Love

Things I love (or TiLT) posts used to be very popular--I’m doing them myself this Blogtober, just like last year! They are fun, short posts that can highlight some of your favorite bloggers, tv shows, podcasts, and more!

3. Inspiration

Every Sunday during Blogtober, I do Inspiration Sunday--it’s a series I started back in 2010! Seriously! I share photos, stories, and more that have been inspiring me to write, to create, or just to think. If you’re like me and addicted to saving pretty pictures every month, inspiration posts are a great way to show them off.

For Beauty Bloggers

4. Favorite Autumn products

What products are you favoring this month? You could even divide this into pieces: lipsticks, blushes, powder, foundations. The change in season often means a change in makeup trends. What’s on the radar? Share what you’re loving! I’ve got a bunch of these posts coming up this month.

5. Skin products

Change in season, change in weather, change in skin! How do you handle the changing season? Depending on your climate, some people become drier in the fall and winter or more oily due to humidity! What products help you keep your skin looking snatched?

6. Nail polish roundup

Nail polish trends change rapidly. Remember when everyone was obsessed with mint candy apple from Essie? Same. What nail trends are we seeing this year? Or, what nail tutorials have you excited to paint your nails? Show off some fellow bloggers, post your own nails, and more. There are so many ways to take this!

For Mental Health Bloggers

7. SAD Awareness

For many, the change in season--slightly drearier weather, less sunlight hours, more time indoors--can be really difficult! For mental health bloggers, discussing SAD can help break the stigma. Even though I love Autumn, I struggle with SAD, especially once winter starts. Sharing tips for aleviating SAD can be really helpful!

For Everyone

8. Favorite post roundups

Seen some amazing posts from your favorite bloggers? Write a roundup (sometimes called a carousel). These are so fun to do because you can really highlight some voices that need boosted.

9. Autumn memories

What’s your favorite memory from Autumn? The first Halloween that you remember? What are your Autumn traditions? Share it all in a blog post!

10. Why I Love Autumn

Autumn fanatics, what’s your favorite thing about Autumn? Writing a blog post that highlights your favorite parts of Fall can be really fun to just get out--you can share tons of photos, link to past and present blog posts, and just spread that Autumn spirit!

Here Are 5 Steps You Need To Know To Write Killer Blog Posts

Here Are 5 Steps You Need To Know To Write Killer Blog Posts | Writing Between Pauses

Back when I started blogging, I really didn't pay attention to, well, anything when it came to my content. I wrote what I wanted. I used photos that didn't really go and weren't consistent sizes. When I was really into fashion blogging, the popular thing was to use song lyrics or quotes as the titles of your blog posts. It was so much fun trying to decide what to title my posts! 

These days, with the blogging world being what it is, it takes a bit more effort than that. Even if you're just blogging for a hobby, you want to do the best you can with what you have--ultimately, if you're blogging, you want readers! And the best way to attract readers is to write great content and then ensure that you hit every point to ensure that readers can find that content.

But how can you do that? If you're like me, you work a full-time job, or you're a mom; you don't have time to learn every SEO tactic or spend hours writing posts. Well, I have 5 steps for you to follow to ensure that you can write killer blog posts with the time you have. No messing around, no fussing, no spending hours deciding what to write. 

1. Take or find the perfect photo. 

Humans are naturally visual people. We like art. We like photos. So your blog post should start with not just a topic, but taking or finding a perfect photo. If I don't feel like taking photos, I use Unsplash to find a stock photo that fits my topic. Then, I use Canva to create blog graphics that are uniform and use the same fonts every time. (This is the simplest part of branding: ensuring that all your images and blog graphics have the same basic look that people can recognize and associate with you. It also makes your blog look cleaner!) 

2. Craft the perfect headline. 

Writing headlines (or titles) for my blog posts is one of my least favorite tasks. Most people struggle with it. In my career in content/digital marketing, almost everyone I know struggles to write headlines. It's a universal issue! There are so many rules about what headlines work and what headlines don't, especially for blog posts. Thankfully, I have some resources. 

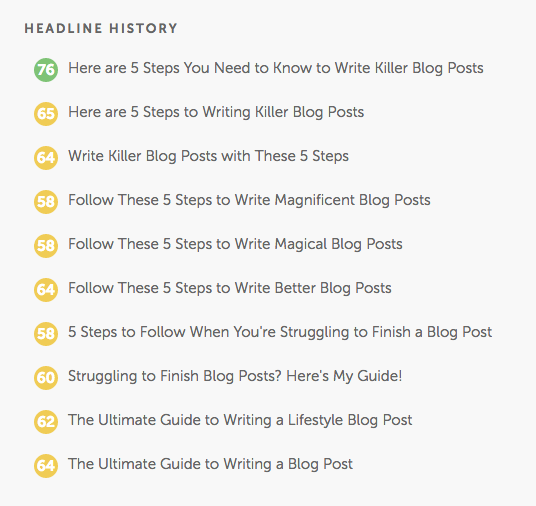
Firstly, CoSchedule's Headline Analyzer is a free tool that anyone can use (they do ask you to sign up for their newsletter, but their newsletter is very informative!) It scores your headlines using a simple algorithm for successful headlines. Here are a few I wrote for this post. 

CoSchedule Example 1

I usually like my headlines to score between 65 and 75. However, sometimes, if I am particularly tied to a title, I just ignore the score! However, using this analyzer is a great way to learn how to write headlines--so you can just go for it sometimes instead of hemming and hawing! 

CoSchedule Example 2

Here's what the breakdown looks like. CoSchedule has a great breakdown on blog post types and examples of common, uncommon, emotional, and power words here

I usually write about 15-30 headlines for each blog post until I decide on the one. 

3. Outline your thoughts. 

Diving right into writing can seem like a good idea, but writing down an outline, even if it is just a rough sketch, will ensure that you stay on topic and don't get stuck halfway through writing. Even if you're not writing a blog post that features a list or steps, you can jot down all the points you want to cover. For this blog post, I wrote down the 5 steps I wanted to include, then started backwards from there to pick points for my introduction.  

4. Clean up your copy. 

I am a verbose person, so this is hard one for me: once you're done writing, go through your blog post and clean it up. Remove repetitive phrases. Shorten sentences. Move separate thoughts into separate paragraphs. This improves the readability of your post. (Most blog posts are skimmed anyway, so the faster you can convey your information, the better!) 

5. Check for places to link other blog posts. 

If you can link to other blog posts of yours (or your friends!), do it! It's worth taking a few extra minutes to add links and include a brief sentence as to why they should click over to that blog post. 

BONUS: 6. Share to Pinterest, Twitter, and Facebook. 

Alright, this isn't a step about writing, but it is about getting those all important readers. None of us like talking to thin air, that's for sure! I share my blog posts automatically via Squarespace with my chosen hashtags. I then make sure to pin daily to Pinterest, as well as to my group boards on Pinterest. If you use Facebook, share your post there too; Facebook is the number one website for referral traffic. 

3 Affordable Accessories to Improve Your Blog Photos

3 Affordable Accessories to Improve Your Blog Photos | Writing Between Pauses

One of the most difficult parts of blogging, for me, has always been the photography. I really enjoy photography, but it's not something I'm inherently good at--and I've never really been patient enough to really settle down and learn much beyond just getting it done. 

I don't think blog photos need to all look the same. Trust me on that one: you can be successful with photos taken on your iPhone. As I've written before, I have a tried-and-true process for iPhone photos. (You can also read my post on improving flat lay photos here.) 

Another thing I've always been unwilling to do is pour a ton of money into taking blog photos. If I already bought the product I'm taking a photo of, then why on earth would I spend more money to take a photo with it? I've never bought a better lens for my camera (despite really, really wanting one) because I just don't foresee it paying off in the long run; for the same reason, I just don't believe in buying a ton of materials to make my blog photos pop. 

Here's what I have bought to help improve my blog photos. 

1. Printed poster board ($1.99 at craft stores or $20+ for a pack) 

The biggest change to my photography game has been buying a printed poster board. I got mine for $2 from Michael's; it's a rustic, white, barn wood background. It has really made my photos look a lot prettier and more cohesive! Plus, it's easier for me to organize items on a smaller space. These are just like the one I have, but for a pack of 12! However, if you check your local craft stores, there are tons of designs, depending on what you want for your photos. There is a really pretty pink floral one at my local Michael's that I'm definitely considering. 

2. Create a "stage" (<$30) 

Many times, photos are staged on a platform. Many people use their desk that they clean up for this. However, I realized I needed a bit more space and freedom (and also my desk is a constant mess of bills and notebooks). I tore down a diaper box to be the bottom, plus 2 sides; I just recently bought some cheap sheets of tile, like you put on a backsplash, and have been working on a way to fix them onto the box. Then, I'll paste a plain white foam board to the bottom and voila! I've made my own little stage that can mimic a bathroom sink, or a kitchen counter, or anything really. This is still a work in process,  but so far, it's only cost me $20 for the three sheets of stick on tile and foam board. 

3. Camera Tripod (<$20) 

My greatest issue taking photos with my DLSR (which I've started to do more, even though I love the ease of just using my iPhone) is that I have quite shaky hands. If I'm taking photos in low light, then I've adjusted the settings on my camera enough that even the slightest shakiness will end up with blurry photos. I've just put in an order for a new tripod; I picked this one, which comes with a remote. However, you can find tripods for as cheap as $10-15, depending on where you look. As long as it attaches to your camera, or has a way of holding your cell phone, it doesn't need to be expensive! 

Is Instagram Even Worth It?

is instagram worth it.png

If you follow me on Twitter, you know I've been doing a thread of observations I've made since switching from a personal account to a business account. Most of the thread is based on numbers, a disparity between follower counts, and more technical bits. I'm planning to write a full blog post about that next month (I need one more month of data to really inform my conclusion on it), but I wanted to ask, and perhaps answer, a question about Instagram today: 

Is doing all this work even worth it? 

I know some have wonderful success on Instagram. And that's great for them! But the vast majority of bloggers and small business owners, from what I can tell, struggle to make Instagram work for them. 

It's hard to exactly know how to fix the platform. What causes some people to grow so quickly and others, who are doing the exact same things and sometimes posting more meaningful content, to grow so slowly or not at all? Is it just purely luck? 

A huge issue seems to be, of course, the move from chronological order to an algorithm based on your personal likes and whose story you've watched. While in theory that sounds great, in reality what happens is that you end up seeing photos from 5-6 days before on your feed... instead of the stuff that people just posted! That means that when I post a photo, most likely no one who actually follows me is going to see it for at least 24 hours to 2 days; posting anything topical becomes really difficult, to say the least. 

There are other issues within the blogger community that make growing difficult. Following and unfollowing is a big issue and can feel like such a downer. That's not the only thing, there are absolutely more, but it can all feel like a huge weight when you're just trying to do the best you can and see results. 

It's no wonder, truly, that people go to the extreme lengths of buying followers. It absolutely won't help your brand at all, but it will make you feel a bit better about struggling to grow!

In the past 2 years, I've doubled my followers. From 300 to 600. For some people, that's pretty significant; but in that time, others have started Instagram accounts and climbed to thousands of followers. I definitely do want that kind of success or those numbers (being famous scares me!), but I do wonder just what exactly I'm doing wrong. I've improved my photos. I've upped my hashtag game. I've done everything I can aside from turn into one of those emotionless Instagram accounts that's all about aesthetic. (No offense to Instagram accounts with themes.) 

So, knowing that I'm not really alone in feeling this way, I have to wonder: is Instagram even worth putting this much thought and effort into? It's still listed as many people's favorite social media, but when it comes down to numbers, I don't see evidence for it contributing to blog traffic--just potential for sponsorships! That's where it gets difficult, isn't it? 

I might decide to let Instagram go and not try--but in the end, that hurts my ability to work with brands. It's brands that want a large Instagram following, really, and it's something that a lot of bloggers just can't provide. What happens to us? What happens to the people who have a large Twitter following, good traffic, and a bumpin' Pinterest profile... but not a great Instagram presence? Do we get left behind because where we thrive isn't where brands want us to thrive? 

It's a lot to think about! So I'm turning it over to you: what do you think? Is Instagram worth the hassle? Am I overthinking this? 

All My Goals for January 2018

All My Goals for January 2018 | Writing Between Pauses

This year, I decided not to write a list of resolutions. As I've written before (like in my post about setting goals), I find it is easiest for me to break things down into easy, digestible pieces. And often that means focusing on small, week-to-week or month-to-month goals versus a large, overarching goal.

1. Meal Prep 

When I say "meal prep," I definitely don't mean making 400 prepackaged meals. Nothing turns me off food more than it being old and soggy. Also I got food poisoning in October from a banana muffin, so I'm not forever suspicious of leftovers of any kind. However, a few years ago, I would often cook up a big thing of brown rice and a bunch of protein, and just add veggies and condiments throughout the week. That way, I'm not just microwaving a little plate and having to look at the same meal over and over and over again. I want to start having ingredients prepped (rice cooked, chicken ready, veggies trimmed, washed, and cut up) so I can more easily make dinner and not have to do a complicated tango with Forrest in the kitchen every time I try to make dinner. 

Danny and I have a shared goal of cutting out junk food (mainly fast food, because it's so easy to stop and get a Dutch Bros or a sandwich instead of making something at home), so this is definitely part of that larger goal. 

2. Rededicate myself to working out 

Danny and I joined (well, I rejoined) the gym in April and for about 4 months, I was extremely dedicated. Then I just got really tired. I can't really explain what happened, but I think a lot of it was burn out: by the time October rolled around, I had been working part-time, running my blog's new content strategy, and working out. I was tired a lot and often ended up accidentally napping on the couch--and worse, I was half-assing it at the gym. The past few weeks, I've actually taken a break from the gym (Danny, a rockstar, is still going) and just been focusing on eating healthy. In January, I want to really want to go to the gym again and dedicate myself to a system that I know works (lifting weights). 

3. Write blog strategy for 2018 

Recently, I mentioned that around August, I gave myself an ultimatum: I had 1 year to make this blog work or I wasn't doing it anymore. I've been blogging for nearly 10 years and while I've never reached any kind of success, I feel like I have at least muddled through with a following and decent numbers. However, just in terms of effort-I'm-putting-in versus what-I'm-getting-out, I definitely was putting in almost no effort and getting none in return. In short, I wasn't happy, but I didn't exactly want to quit blogging. I realized that I needed to actually make an effort, do all the things I'd read about for years, and just deal with it. Just get on with it! So in August, I wrote a short, 3-step blog strategy that I've been following. It's not perfect. This month, I'm planning to write a more complete strategy for really making this blog work. Wish me luck! 

(Click here to read my post about achieving goals for your blog!

4. Redesign blog graphics

I currently use Canva for my blog graphics and, while I love it, there is definitely an element of "nearly every blogger uses this font"! The fonts I selected as my design moving forward happen to be some of the best Canva offer under the free plan. Moving forward, I want to do a redesign of my font aesthetic and start using photoshop to create my graphics, if only so I can differentiate my look from others! 

(Click here to read my blog post about Canva & how I use it for my blog.)

5. Write for 20 minutes a day

This is one that is really difficult for me, but I want to write 20 minutes a day. Michelle, you're probably thinking, you work as a writer, with a side hustle as a blogger. You write already

Well, this goal is actually about journaling. I love journaling. I've been doing it since I was 12 or 13. But in the past few years, it's definitely fallen to the wayside. So this month, I really want to try to hand write in my journal for 20 minutes at least every day. 

(Click here to read my blog post about how I refuse to force myself to be productive.)

4 Tips for Blogging Through the Holidays

4 Tips for Blogging Through the Holidays | Writing Between Pauses

Whether you blog professionally or for a hobby, I think we can all agree that sometimes keeping up posting, scheduling social media, and promoting our blogs can be really difficult. Especially during the holidays when things can get hectic and stressful fast. 

Every November and December, I inevitably experience a few moments of just not being able to get to my blog or stay on top of things. It seems easier to let my blog slide--which I inevitably regret when I'm doubly behind come January, having missed posts that I desperately wanted to have up before the new year. 

I've been scouring the internet and collecting the best advice to stay blogging through the holidays. Here's what I've found. 

1. Auto-Schedule In Advance

I think these days, auto-scheduling is the law of the land when it comes to blogging. Back in my Locked Out days, I would sit down, write a post, and post it then and there. That was it! These days, I usually have at least a week of blog posts scheduled out. When it comes to the holidays, or filling in gaps where you'll be on vacation, scheduling comes in handy. 

Alongside scheduling, that requires you to have your content worked out in advance. I have a running editorial calendar for each month so I always know what I need to write and when it will be posted. 

2. Take Part in Blogging Challenges

Honestly, getting my Blogmas content ready for December really helped me step it up this month! It's only the 13th of December, but I have content scheduled through Christmas and beyond. Taking part in Blogmas (or other blogging challenges) is a good way to write content in advance and always have something to motivate you to keep going. 

3. Write Shorter Posts

This is a big one. Not every single blog post needs to be super long, involved, and heavily researched. Short, quick blog posts that share a quite inspiration, a thought, a few tips, etc. can be just as meaningful. A prime example of this is the fact that my post from Blogtober about my 4 favorite teas is one of my most popular blog posts of all time. 

4. Step Away from Social Media

I think the most important thing to do is that once you get content scheduled, a few promotional tweets scheduled, and everything ready for the week of the holidays... step away. Don't worry about it. Do everything else that you need to do, but don't worry about your blog! Step in and check in the evenings, make sure all your social media is going fine, but it's ok to take a break and enjoy the holidays too. 

Reflection: How Was Blogtober?

Reflection: How Was Blogtober? | Writing Between Pauses

Blogtober: the best of times, the worst of times. October is my favorite month of the year and so it always feels like the shortest. This year especially it seemed to really fly by. 

I wanted to talk about how Blogtober, as an exercise, made me feel. At the end of October, I sent out a newsletter where I talked about how I enjoyed Blogtober because being busy, mentally and physically, helps me to relax and keeps me from going into an anxiety spiral. For that reason, Blogtober was really fun and I had one of my best “mental health” months for a while. 

The Pros

What are the pros of Blogtober?

Firstly, I had the absolute best month, sponsorship opportunity, views/visits, and social media wise, in a long time. I know these numbers are slightly inflated because I was posting every day and so, purely, I just had more posts for people to visit. But after so long of feeling like I was putting in so much effort and seeing no growth, it made me so happy. I feel like I picked up some genuine new readers too (hello!) and email subscribers. I’m so happy to have you here. 

Secondly, Blogtober gave me some really good ideas as to what kind of content people like the most, what brings in new readers, and what helps me keep readers coming back. These are technical, kind of business-focused topics that sometimes bloggers don’t talk about. I fully believe that blogging should be about enjoyment, first and foremost, but at the end of the day, blogging into a void isn’t exactly fulfilling! 

The Cons

Firstly, there were a few times throughout the month where I thought: is my content suffering here? I personally picked each topic I wrote about; each blog post was from a list of ones I had been meaning to write. But when you’re writing a ton in advance, not having time to take pictures for each, relying on stock photos… it starts to feel a little anonymous, you know? However, I don’t think my content suffered overall; sometimes, I just felt a bit rushed and didn’t write what I really wanted to write. 

Another con: sometimes it felt like my Blogtober posts got lost in the jumble of other Blogtober posts, as well as my own. At a certain point, I completely forgot what was scheduled for what day; it was really hard for me to remember, working a week or two in advance of each post. It’s not how I usually operate, but it’s what I had to do to stay on top of things! I do need to work on being more organized (oops) about my blog posts, but I’ve yet to find a system that truly works for me.

What did you think of Blogtober? Did you participate? Would you? 

4 Tips for Taking Better iPhone Photos

4 Tips for Taking Better iPhone Photos | Writing Between Pauses

While I do own a DLSR camera, I find myself often too busy to actually use it. Lugging a large camera downstairs to take photos, all while trying to get everything done quickly, isn't super practical with a toddler. For that reason, I often use my iPhone to take photos and then I edit with A Color Story. I wanted to share my process and tips for taking my photos using my iPhone. For beginner bloggers (or really anyone!), it's totally possible to take all your photos with an iPhone--no expensive camera needed! 

1. Light Matters

Taking Better iPhone Photos

My usually process for taking photos is to get as close to a window as possible, but to avoid any direct sunlight. That means, my bedroom window in the morning or kitchen patio window in the afternoon: I get a good amount of light in these two spots, but because of the direction of the sun, it's not a super harsh direct light. Why should you avoid direct, bright sunlight? It will cast a harsh shadow over your photos that your iPhone camera can't correct and will ultimately make your photos look washed out. 

2. Pick a Consistent Background

Taking Better iPhone Photos for Blog

You may notice that I typically use a plaid background for my photos. Why? Mainly, I just like the look of it. While the typical white marble or white fence backgrounds are popular among bloggers, I didn't want to have to go buy a specific prop just for photos. I use my favorite blanket scarf! A lot of why I do this is to have a specific "style" of photo of my own--and also, I know how photos on my favorite background will look and I have worked out a way to do the best editing with this background. To me, this just makes it easier to take photos because I know how to edit them right off the bat. 

Some people like all white or solid color backgrounds for this reason, but for me, the plaid helps me angle things in a way that I like. 

3. Use an Editing App

Taking better photos with iPhone

As I mentioned, I use A Color Story to edit my photos. I find this the easiest app to use, mainly because I love the look of A Beautiful Mess's photos and their filter packs are affordable and really good for a variety of photos. Below, there is a step-by-step of how I edited the above photo. I took this photo in indirect sunlight outside. 

Step 1
Step 2

Step 1: I use the Disco Ball filter from the Good Vibes pack at less than 50%. Disco Ball increases the brightness, but doesn't increase shadows; it also makes everything a little "whiter". I like this filter to start out because it evens out the color really well. 

Step 2: I use the Palm Springs filter at less than 50% next. It's also from the Good Vibes pack. Just like Disco Ball, it brightens and whitens--but Palm Springs also gives a nice airy, light look to the photo while keeping it very clear. Contrast increases slightly. At this point, I'm just looking to make sure the white in my background is looking white instead of gray or cream. 

Step 3
Step 4

Step 3: I switch to the Seasons pack. Seasons is a pack you have to pay for, but at only $2.99, it's super affordable and I love these filters! FIrst, I use the December filter at around 50%. December increases contrast and shifts the color to be more blue or neutral (depending on how yellow everything is looking). I love how it punches up greens and blues in photos! This helps my photos look nice and vibrant. 

Step 4: I then apply October at less than 50% (I prefer closer to 30%). October is an extra step that I don't always use. It increases red and warm tones (notice how the red looks a little more vibrant and the orange in the leaf is more intense); for this photo, I just felt like it needed the warmth punched up a little more about I applied December. 

That's my exact photo process! It's easy to use and play with to get the look you want for your photos. 

4. Practice Makes Perfect

photo (20).jpg

There are still times when I don't get photos right. For example, in the photo above, I love the light and contrast--but the white of the scarf still looks gray and dingy; as well, the color of the flowers could be brighter in comparison to the red-black-and-pink tones of everything else in the photo. However, by practicing consistently and working to take better photos, I feel like I am always improving and getting better at my technique.