organization

5 Products to Help Organize Your Alaskan Cruise Packing

Packing for myself for a 7-day trip is often a slog. But packing for 3 people (myself, my 22-month-old, and my 8-year-old) is almost torturous. It’s overwhelming and daunting. 

But I’ve found a few things to help me pack for my kids that take the stress out of it—plus a few pieces that I think will help make your Alaskan cruise just a little easier. 


1. Day of the week packing cubes

These packing cubes have the days of the week on them and let me tell you, they make packing for kids so much easier. While I was packing for each kiddo, I just laid these out on the floor and stacked outfits and pajamas on top for each day. It cut down the amount of guesswork and just made my life so much easier. Plus, it makes being on the cruise easier as well; my 8-year-old was able to grab the day he needed and change without digging through a suitcase full of clothes. Win-win. 

2. Wet bags

Wet bags aren’t new, but they are a valuable packing tool. I used wet bags to pack swimsuits and sunscreen; this way the sunscreen was contained in case it burst and I knew to look for the wet bag when digging for swimsuits. Plus, once we were on the boat, I carried one with us in case of an emergency diaper change. 

3. Laundry bags

For years while traveling, I have packed a garbage bag to put our dirty laundry in. Times have changed and I knew I needed something a little more resilient for this trip. Plus, you never want someone to mistake your dirty laundry for garbage. These laundry bags are MASSIVE (like way bigger than I thought!) They come in a two pack. We filled one up entirely on our 7-day trip and I was able to put it into our largest suitcase (which was pretty much empty by that point). It keeps the dirties contained until you can handle them. 

 4. Toddler cutlery 

Toddler cutlery? What’s this doing on the list? Well, as I was packing I kept thinking about if they would have toddler cutlery on the boat. News flash: they don’t. I ordered this set to keep in our stroller and it was truly a lifesaver. Violet is at the age where she wants to do everything herself and trying to wield a too-big fork just wasn’t it. This set is compact and barely takes up any room. Perfect for streamlined packing. 

5. Toddler leash harness 

Last but not least, a toddler leash. I know, I know, this might be controversial. But cruise ships can be CROWDED and toddlers don’t like being contained. I recommend not bringing a baby carrier for your toddler—it was just impractical—and opt for this instead. It is super compact and takes up less space than a baby carrier, and you’ll be able to let your toddler have a little bit of freedom. 

How to Create Workflows to Simplify Your Life

How to Create Workflows to Simplify Your Life | Writing Between Pauses

Whenever I speak to a new client, I talk about workflows. Here are a few questions I commonly ask:

  • What’s your current workflow for this?

  • Do you have a workflow for your social media approval process?

  • What would your ideal workflow be for this item?

Workflow is a mouthy word and, to be completely honest, it’s not the best word in the world. It sounds complicated. It sounds jargon-y. It sounds kind of terrible.

That being said, workflows are one of the best ways to keep your small business running smoothly, especially if you offer a service-based product.

About 6 months ago, I started trying to keep track of all my different workflows: the processes I used in my business and my day-to-day life to keep things running smoothly. Workflow is a fancy word for “this is what I do, what I use to do it, and why.” That’s it! That’s literally all a workflow is!

But you’d be surprised at how writing down your existing workflows, and working on documenting new ones as you add services or products to your business, can improve your time management and efficiency.

Here are a few of my top tips for creating workflows—and a few examples.

1. Pick a Place to Save Everything.

Choose one platform to keep all your process and workflow documents. This could be Notion, or Google Docs, or the Notes app on your phone. No matter what, keep all your notes in one specific place so you can tweak them when things change (like when you find a better tool for scheduling) and refer to them if you need to train someone on how to do it.

2. Pick a Format That Works for You

I personally like flowcharts best for my workflows—but some people prefer step-by-step outlines, numbers, or just sketches or notes. Whatever works for you, stick to that format. If you find it isn’t working (or you find a better method), don’t be afraid to switch. Just make sure you switch everything to the new method.

3. Focus on Efficiency

Part of the beauty of workflows is always knowing what comes next when you’re working on something. If you a service-based business, then being able to send a client-facing document that outlines the process you’ll follow for them is huge in terms of customer service. Making these documents (or systems) as efficient as possible, and keeping them organized, will help you be more efficient.

That being said, when creating workflows, focus only on the bare minimum steps. If you’re like me, you sometimes get caught up in the little things. For example, some of my social media clients prefer a week-by-week approval system; others prefer to have all their social media done in bulk for the month. That means, those two workflows will be different in terms of timing—but not in how I actually plan for that content, since I plan each month at a time. For the sake of efficiency, I keep my “social media strategy and content development” workflow simple: just the steps I follow, regardless of the time period it occurs in.

4. Use Workflows to Stay Focused

I’m easily distracted and I get very excited about new tools. This can really derail my work day if I’m not careful; having a workflow that I’m familiar with and I know to follow every single time for best results (and maximum efficiency!) helps me cut down on some of that distraction. It also really helps my to do list; instead of having one huge, bulk item (like “social media for X client!”), I know what steps it separates out to and can schedule them through the month appropriately.

Some Example Workflows

Need some examples? No worries. Here are a few basic examples of my workflows that I use most often.

Social Media Workflow
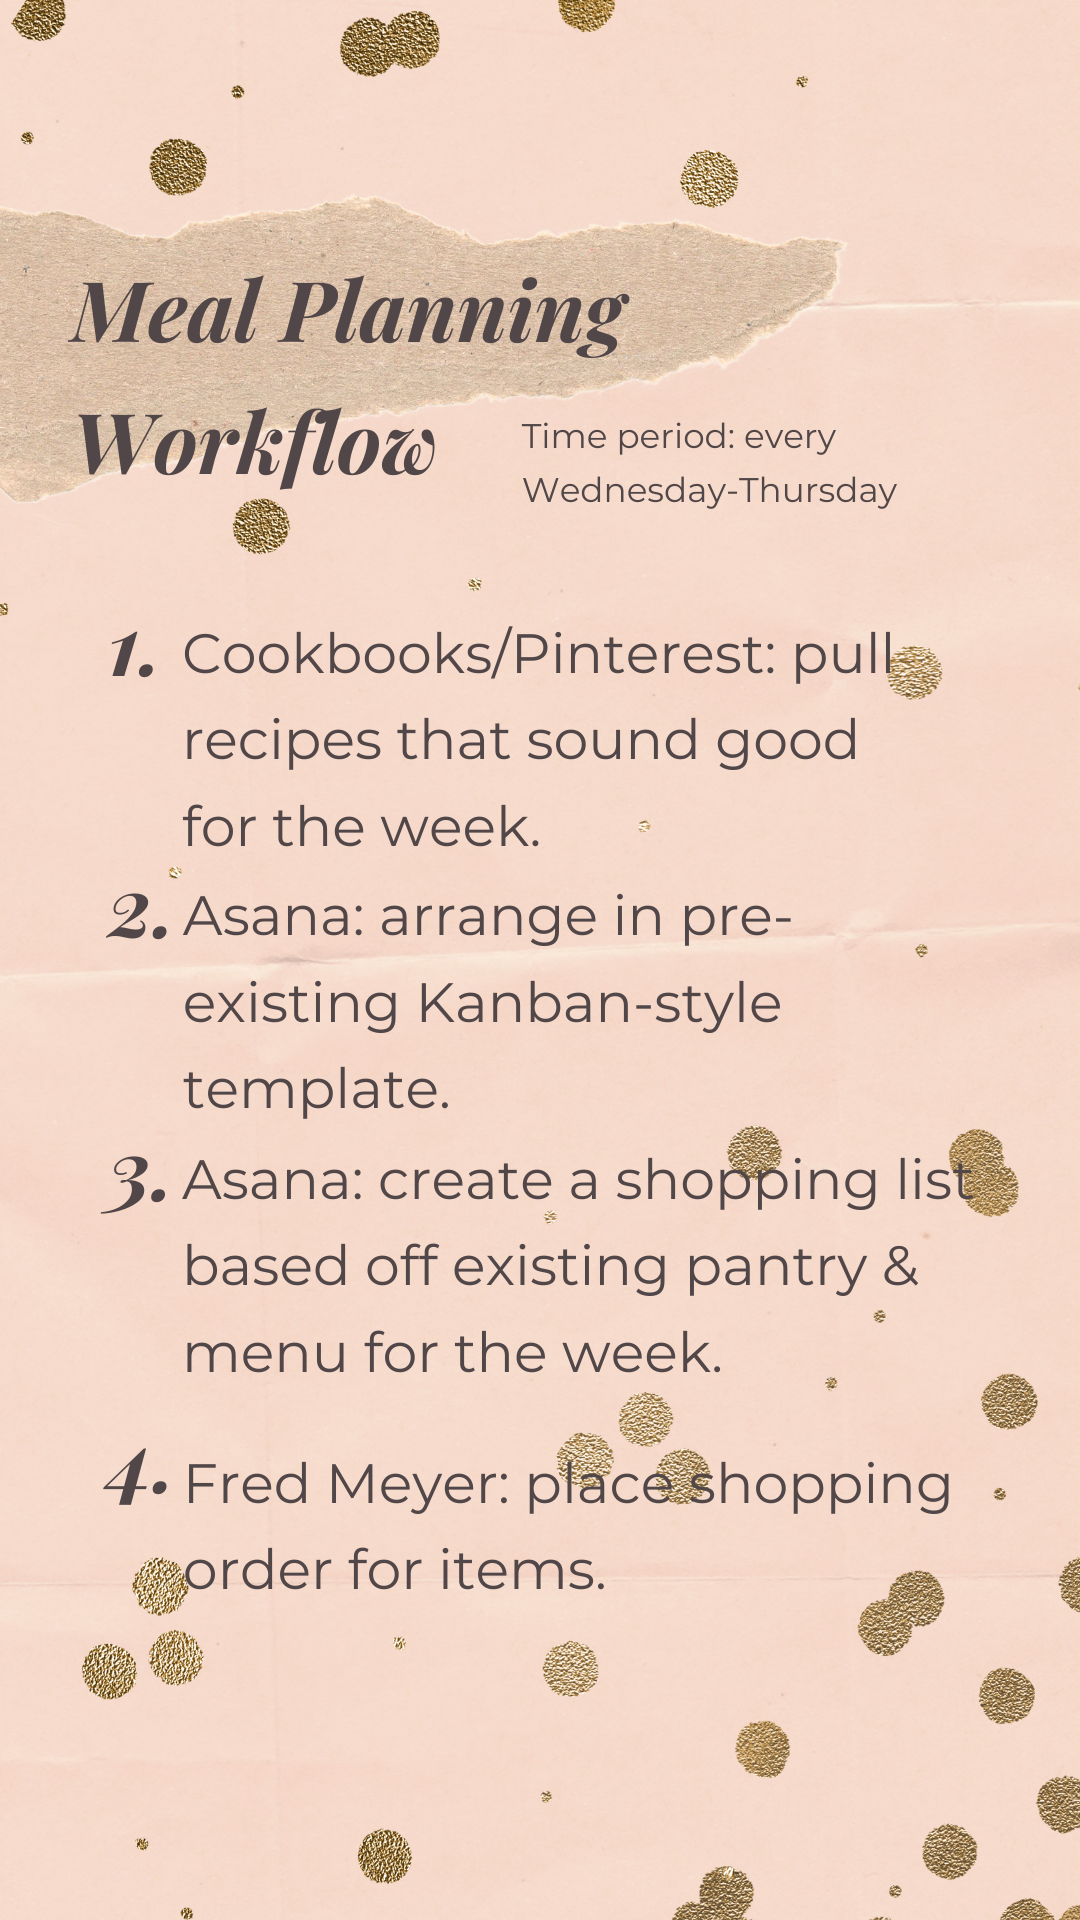
Meal Planning Workflow

The best thing about workflows is that I can easily give them to anyone to let them know my process or ask for help with something. Maybe not with meal planning, but if I were to ever hire a VA or fellow freelancer to help with my clients, the social media workflow would help me save time. These are just short summaries; my full workflows tend to have a flowchart set up, with notes and more info, like where I pull content ideas from, how long it typically takes me to write content for a month (or for blog posts), and more.

How to Create Workflows

Like I said, pick a format that works for you. Then, when you’re working on a project (such as creating something for your store, providing a service to a client, or whatever), jot down the steps as you work, including the tools you use and any notes. Then, work on putting those notes into the format of your choice, streamlining the information.

Once you have your workflow in a format and form that you like, work on creating a client-facing version, if you want; this can help keep your clients organized and aware of your process, as well as when to expect things. (This will also help you set deadlines and keep expectations clear!)

Workflows are a simple organizational step to help you be more efficient in many different parts of your life. I hope you found this blog post helpful! Let me know your thoughts in the comments.

Freebie: My Checklist for Daily Organization

Freebie: My Checklist for Daily Organization | Writing Between Pauses

I’m so excited to be sharing the last installment of my Let’s Get Organized series. Organization is not about perfection; it’s about having the tools and systems in place to make your life easier, whenever you need it. If you’d like to see May-June’s series on Daily Routines, click here. If you’d like to read the previous posts in the Let’s Get Organized series, click here.

Today’s post is going to be short-and-sweet. I feel like I’ve shared everything I can about creating an organization system that works for you and just you. To reiterate, here’s what to focus on:

  • Small spaces first, and then larger.

  • Focus on the issue that is keeping that space disorganized (such as too many papers, not having the right storage system, etc) and not the aesthetics.

  • Small, daily organization works better than every-6-month-organization-spree.

On that last note, I have a daily organization checklist I’ve been using to help clean up my spaces.

Daily Organization Checklist

Every week, I print a fresh copy, write out my to do items for keeping my newly organized spaces, well, organized, and then pop it on the fridge to remind me. Here are a few examples of my daily organization items:

  • Sort and file new mail.

  • Shred any papers in my office that I don’t need.

  • Clear kitchen counters and put away clutter.

  • Load, run, and empty dishwasher and dish strainer.

I really hope this checklist will be helpful to you as you try to become more organized!

.

Is There a One-Size-Fits-All Organization System?

Is There a One-Size-Fits-All Organization System? | Writing Between Pauses

I’m so excited to be sharing the second installment of my Let’s Get Organized series: 3 Habits to Stay Organized. Organization is not about perfection; it’s about having the tools and systems in place to make your life easier, whenever you need it. If you’d like to see May-June’s series on Daily Routines, click here. If you’d like to read the previous posts in the Let’s Get Organized series, click here.

There are so many organizational systems out there. And when it comes to finding the best one for you, it can be easy to get overwhelmed. Everyone is talking about Marie Kondo—but I hate those little bins, boxes, and storage systems. Or, you might hear things about having a Command Center—but you might not have storage or space in your home to make that work. You see all these organizational systems and you think… how can I make those work for me? They work so well for other people, but I can’t get my head around it.

Here’s the thing: sometimes organizational systems are presented in a way that makes it seem like once you get X, Y, and Z into place, it will be easy. Or that, everyone has the same abilities as another person, it just requires motivation to get that original bit done.

I’ve been organizing my own stuff, and organizing the stuff of other people, to tell you that this simply isn’t true. Sometimes, organizational systems just don’t make sense to anyone outside of the person who is doing the organizing—and that’s ok! If you’re organizing a room or closet just for yourself, then you don’t really need anyone outside of your family to understand the system.

To answer the question in the title of this post: no, there isn’t a one-size-fits-all organization system. But here are a few ways to find or design one that works for you.

1. What is it that overwhelms you the most?

When it comes to getting organized, what is the number one thing in your home that overwhelms you? For me, it’s mail and the papers we need to save. This overwhelms me so much! I know I need to hold on to medical bills for taxes, receipts, property taxes… there is so much paperwork that piles up. School registrations, sentimental papers, drawings. It gets super piled up really fast.

For me, the number one thing I need to tackle is creating a system that helps control paperwork in my house. That makes it easy to file immediately, find what I need, and look good at the same time.

For you, it might be organizing your pantry. (It can get out of control so fast, especially with all of us home more!)

Or it might be cleaning out all your closets throughout the house.

Or it might be organizing your various collections: DVDs, music, records, serving platters, whatever.

Whatever it is, identifying the main aspect of organization that is challenging for you should be your starting point.

2. What kind of space can you invest in to get it under control?

Let’s use my example. I want to get my paperwork, mail, and more under control. What can I invest in that makes it easy to control?

Firstly, I need a filing cabinet. Right now, I have a filing box that is a little too small, but it works for the moment. I also know I need some kind of sorting system for mail that will go alongside the filing cabinet. One thing I’ve started doing for mail that is so helpful is answering the 2 F’s about each piece: can I file it or frame it? If not, it gets thrown away—I don’t need to save it. So I know I need a system for those two pieces: framing (saving, storing, whatever) and filing.

Obviously, a filing cabinet can be pretty expensive. I don’t know if you’ve ever looked at filing cabinets, but it is so hard to find cute ones that aren’t ugly as hell. I also have the (slightly picky) request that my filing cabinet be large enough for my printer to sit on top of. (I know, I know, what a big ask!)

For me, this is what I’ve been researching and pricing out with the hopes to purchase soon. It’s not big: it’s just a filing cabinet. But it will really change my life, I think.

For you, it might be paying for new shelving in your pantry, or buying a bunch of nice storage bins for your closets, or buying those night shelves for your garage. Whatever it is, what can you invest in this system to help you? That’s your second point.

3. What would help you make it easier?

“It would help me so much if my husband understood this filing system and could file as well.” That’s mine. I want my husband to be able to understand our filing system, once we get a big filing cabinet, so that instead of holding onto important papers and misplacing them, he can just file them himself without disrupting my system or asking me to do it for him.

For you, this might mean setting rules for your pantry (no going into the pantry after 5pm, as an example), or setting up a weekly Saturday clean up of your closets. Whatever it is, sit down a make a list: if you could have the perfect system to keep the space you’re working on organized, what would it look like?


There is no one-size-fits-all organization system. Probably because no two houses are exactly alike, no two families are exactly alike, and no two people own exactly the same things or require the same function in a space. I hope this has given you some ideas for how to take control of a space and reduce the frustration in your own life through organization. Thanks for reading, as always!

3 Habits to Stay Organized

3 Habits to Stay Organized | Writing Between Pauses

I’m so excited to be sharing the second installment of my Let’s Get Organized series: 3 Habits to Stay Organized. Organization is not about perfection; it’s about having the tools and systems in place to make your life easier, whenever you need it. If you’d like to see May-June’s series on Daily Routines, click here.

Organizing a space is the easy part. You spend a day, or a few days, cleaning out a space, getting everything put away in a way that makes sense, and then it stays perfect forever, right? Right.

Actually, not right. We all know that’s not how it works. We’ve all organized a space and then gone back 2 weeks later and wondered what on earth happened.

Part of getting and staying organized is making it a habit that we work on continuously. A muscle that we stretch and strengthen like any other. It takes routine. It takes patience. It takes a few things that help make it a habit. Here are 3 ways to make organization a habit!

1. Make Your Organization Easy

This one is easier said than done. Basically: make your organization easy for you. There was a great Twitter thread recently about how, for some people, stacked, closed boxes for organization simply don’t work for them. It’s not easy enough. It takes too much time and effort and they know they won’t keep up with it. Open bins, however, work great. While that might not be for everyone, the point is: find a method that works for you. Neat stacks of things? Go for it. Open bins? Yes. Stacked, orderly, labeled boxes? Yes!

Whatever it is that makes organization easy, then incorporate it into your space and life. One thing I struggle with in my office is keeping my desk clear of clutter. I realized recently I need some place to put papers (that I will need to reference later!), random notebooks, etc. I am getting a second bookshelf soon (I know!) and I'll be getting a few open, pretty bins to collect those bits-and-pieces that I need, but don’t have a space for. I’m also getting a filing cabinet soon—it’s long overdue and it will change my office when I finally get one, I think!

Here’s a few ideas of how to make organization easy:

  • Make your organization fit how you use a space. That means, don’t stack things that are basically storage in the pantry; put them in storage!

  • Put everything where it goes the first time—and instead of just shoving it into a closet, take it to the actual closet where it lives. (A prime example of this for Danny and I is our 3 closets that each have 1/3 of our medicine cabinet.)

  • Don’t challenge yourself with your organization. If you really want to be organized, know yourself first—don’t use this as an opportunity to force yourself to try a method you probably know won’t work for you.

2. Make Space for Everything (And If There Isn’t Space, Do You Need It?)

There should be a space for everything you need—and if there isn’t space in way that makes sense, that works, and that’s easy… then ask yourself: do you really need it?

This is sort of a Marie Kondo-esque moment—but not quite that intense. It’s just about simplifying.

Here’s an example: I have 4 tubs of journals. 4 tubs from my entire life. These are important to me. I keep them in a small storage room that is in my office’s closet. It’s a great place to store things I change out pretty frequently or use often, like wrapping paper, decorations for the seasons, extra rugs, tablecloths… that kind of thing. But over the last year, this storage room has gotten insanely disorganized. The primary culprit are these 4 huge tubs of journals. I like to look at them; I’ve referenced them a few times in the past year for random things. But I don’t need them in this space.

They could easily go to the garage! So once our garage is tidied up, that’s where they’re going to go and I’m sticking with it.

All I’m saying here is this: just because something doesn’t work in a space or isn’t needed in a space, doesn’t mean you need to throw it away or get rid of it. It might just mean finding a new space to store it, especially if it’s not something you use frequently or need frequently.

Once you’re really in the work process of organizing a space, deciding what you need versus what you want in that space really is crucial. It will impact how you choose to organize it. And making the right decisions and clearing out things that are just going to complicate the space will make it easier to stay organized over time.

3. Include Reorganization Into Your Routine

My office is a huge bugbear. It tends to be a catch all space where things get put: stuff my mom gives me, stuff that needs to go into storage, random papers, bills… all kinds of stuff ends up there! Right now, I’m still in the process of getting the space cleaned up and organized in a way that makes sense. However, I have started trying to do a quick, 15-minute clean up every evening where I straighten things up, put all the pens back in the pen cup, and at least straighten up my papers.

I also try to take a quick 5 minutes to organize my kitchen at the end of the day: putting things away, straightening random clutter that I need to figure out what to do with, checking the pantry, making sure coffee making stuff is stocked for the morning.

If you make these small tasks of continuously reorganizing and working on a space part of your routine, it makes it that much easier to keep up—and to become a habit. You’ll be more likely to put things where they go rather than just leaving them on the counter or tucking them away in a random drawer if you make it part of your routine to go along after yourself (or your husband, or your kids) and put them where they go. (And obviously, encouraging everyone in your home to do the same thing is the dream!)

Another part of this is, of course, changing your organization when it doesn’t fit. You might think you have a good idea of how to organize a space—but then when it comes to working in your routine and daily life, it just might not. So taking 5 minutes to quickly reorganize the coffee station or silverware drawer so it is more functional is going to make a huge difference and allow organization to be a better habit.

5 Steps for Getting Organized Fast

5 Steps for Getting Organized Fast | Writing between Pauses

Happy July! This month, I’ll be posting a series called Let’s Get Organized!, all about organizing your home, your business, and your life. Organization is not about perfection; it’s about having the tools and systems in place to make your life easier, whenever you need it. I can’t wait to share my tips and tricks, and much more. If you’d like to see May-June’s series on Daily Routines, click here.

Here’s something I famously said to a professor: “Sometimes, I’m so organized that I feel like it holds me back.” I can still remember the way she looked at me, her head slightly cocked, and her expression of puzzlement. It didn’t make sense to her.

I’m a naturally organized person: I tend to always put things back where they came from, I love having a place for everything, and it’s very easy for me to get, and stay, organized. But in many ways, having that rigid of a way of thinking can be incredibly restrictive for, say, writing research papers (where sometimes you need to let your mind and interests wander!) or baking cookies with a 4-year-old (who doesn’t understand where anything in the kitchen is).

When it comes to organizing, I have found that it’s not a case of organizing a space and having it stay there. Living spaces are static: they evolve and change, just like we do. A system that worked when you first moved into your home or apartment might not make sense 6 months later, or after you have kids, or whatever!

Here are my 5 steps to organizing your space—whether it’s your office, living room, kitchen, closet, or whatever you need it—fast. (By fast I mean, in the space of 1-2 weekends!)

1. Start with one small place to organize first.

When it comes to getting organized, take it one step at a time. When we moved into our home a year ago this weekend (!!!), I wasn’t focused on organizing. I just wanted our stuff in the house. It didn’t matter where it went. As a result, we have a ton of messy closets, a messy garage, and much more. I still haven’t found my glue gun, which I misplaced at some point during the move.

However, I know if I tried to tackle every single closet and the garage and the living room and the kitchen all at once, I’d get overwhelmed, stressed, and burnt out on organizing. Just yesterday, I told my husband: my goal for this summer is to get our garage organized into a functional space, not just a bunch of stacks of boxes of stuff that we probably don’t even need.

Pick one space to start organizing and stick with that space, and that space only, for your first round. Don’t move outside of that space; don’t let yourself start thinking about those laundry room cabinets while you’re working on this space; don’t deviate from the plan. Pick one space, seriously.

2. Buy what you need for the space—not what’s available.

I was recently listening to the A Beautiful Mess podcast with Elsie Larson and Emma Chapman (it’s seriously really good!) and Elsie had a tip that I had never thought of before: if you need to buy something to organize the space, buy the perfect thing, not just what’s available. I have always just gone to the Dollar Store and bought whatever organizer bins or storage containers I can find. Sometimes, the options are just not great—but I didn’t really worry about it, even if they didn’t look how I wanted them to or even work in the space.

However, I realized that if I’m going to invest the money, rather than buying 3-4 rounds of different organizers at the Dollar Store or Target because they’re all that’s available… why not just save my money and buy the bins that look cute and fit the space and are functional? Why not buy the right size bin organizer, or the right entertainment center, instead of settling? Thanks, Elsie, we needed that one!

3. Focus on function.

If you search “pantry organization” on Pinterest, you’ll get a lot of super cute pantries: cereal emptied into gorgeous glass jars, Oreos stacked Khloe Kardashian-style, spices in teeny tiny glass jars, all organized 1.5 inches apart from each other in a perfectly clean pantry. If there are brand packages available, they’re boujee brands. And there is also this trendy thing going around where you put up a tension rod and use clips to hang individual bags of chips or crackers or whatever.

I can’t begin to tell you how impractical I think all of that is. Yes, while rushing home from Costco, I’m going to put my box of chips on teeny tiny hangers in my pantry, which my son won’t be able to unclip on his own—he’ll pull the whole thing down, repeatedly. The glass jars of Oreos, oatmeal, flour, and spices? Those will get gross. Better to put all those things where they go: the spice cabinet, the baking cupboard, in storage containers that are functional. The glass jars are cute, but they’re not functional. Those Oreos will get stale. Those spices will be exposed to more air and light than they need to. They’re all at risk of being knocked down at any point.

Your organization should be functional, not focused on what looks cutest on Pinterest. Please don’t feel like you have to buy little hangers for your bags of chips.

4. Declutter as you organize.

It goes without saying, but, I will say it: you should declutter in the process of organizing. That’s just kind of the point.

I recently organized my pantry a little bit. We have 4 Halloween buckets, at least 2 of them full of various holidays worth of candy since… 2018? I don’t know why I moved these from one house to another, but I did and, gosh, I am a little embarrassed about it! I threw them away. And I threw away the box of fruit snacks that we’ve had for a year, the boxes of cereal we opened once and didn’t eat, the mac and cheese that we haven’t touched… there are so much I was just holding onto because I didn’t think about it.

Declutter, declutter, declutter! It’s as important, if not more important, than organizing. Even if you don’t have the time or energy to redo the space you want to get organized, you probably have stuff you can toss or get rid of. That will make the space feel new with hardly any effort.

5. Remember that it won’t be perfect.

Taking on the space of your choice isn’t about making it perfect or Pinterest-worthy. It’s just about getting a system in place that works for you and your life! It won’t be perfect immediately. You’ll find ways to keep improving this space the more you use it and interact with it. And you might also find that the needs of the space changes over time. These are all fine things to have happen! We’re aiming for developing a system for a space, not a set-in-stone piece of perfection.

How to Plan the Perfect Christmas & Stay Organized

How to Plan the Perfect Christmas & Stay Organized | Writing Between Pauses

Repeat after me: there is no such thing as a perfect Christmas.

Your Christmas might not look like a Hallmark movie (and good gravy, wouldn’t we all love an ornately decorated Victorian farmhouse mansion to cover in garland?). Your Christmas might not even look like the one from the Santa Clause.

Whatever Christmas you love, that’s the perfect Christmas for you.

For me, Christmas is this: the tree lit, watching movies on the couch with Danny, Forrest, and Remus, fresh cookies in the kitchen, a candle lit and smelling like either 1) cinnamon or 2) pine trees. That’s Christmas. When I was younger, Christmas was making sugar cookies with my mom, watching the old, classic claymation movies on TV with my brother, and waking up at 3am to open presents (and try to make as little noise as possible with my brother). Christmas every year can be something different, but I want to put the disclaimer here that, there is no perfect Christmas; there is no prescriptive Christmas.

If your Christmas a little Christmas tree with rainbow fairy lights and a Netflix binge on your laptop, then baby, godspeed.

No matter what your Christmas is, I want you to have the most perfect one possible.

Gift Planning Guide Christmas

For the last two months, I’ve been working on a Christmas planner for myself. I’m planning to make a BUNCH of embroidery projects for my friends & family this year, and organizing everything was starting to become… a lot. I had lists upon lists of thread numbers, patterns, fabric I needed to buy, hoop sizes… it was a lot. I was tired. So I started mocking up a gift planner sheet where I could record everything I needed.

Then, I started working on a planner for my decorations, to start cataloguing everything I had and figuring out if we would need to buy more lights (aka which of ours died during the year they were in storage). From there, I started making all kinds of parts to this personal planner: bucket lists, shopping lists, cookie backing lists, a memories sheet to add to my scrapbook. I showed it to Danny once I had it printed and he said: “are you going to share this on your blog?”

It hadn’t even occurred to me to share it, but I started digging around on Pinterest and there are some Christmas planners out there… but so many of them put the onus on gifts and buying and planning out your Black Friday. That’s not something I’m super interested; I just needed one place to keep my lists, keep a running tab on my embroidery projects (and who I’ve gotten a gift for and who I haven’t, so I don’t have to crawl under the Christmas tree to check), and maybe write down a few important memories.

I thought: why wouldn’t other people enjoy this?

Christmas Planner

So here it is: the Christmas planner of your dreams. It includes:

  • 3 pages of gift lists to record who has a gift & who needs a gift (plus a notes section for any details, such as crafting supplies). This is perfect if you like making gifts, like I do!

  • A decoration planner to record what you have where. Keeping track of decorations always feels like a chore. Come February, I end up realizing I’ve had bits of decor still up, with everything else packed away.

  • A shopping list for home, work & school, and “misc” to help keep you organized when it comes to remembering if you need more flour or powdered sugar for those super important sugar cookies.

  • A bucket list to keep track of movies that you must watch, activities that make your Christmas (trip to the Christmas tree farm, anyone?), cookies that you love to make, and more.

  • A memories page to record the best things that happened, everything you did, and your memories of Christmas day right away. This page also includes a section of things to remember for next year, like that your kiddo loved a specific movie or song!

  • A page just for Christmas Eve & Day to write down your plans. This page actually has two sections for Christmas eve because I found I needed much more room than was available! But you can use the second section for notes or Boxing Day!

I keep mine in a folder on my desk, but I plan to laminate the pages once Christmas is over to save in our family binder. You can keep yours loose leaf if you want, put them in a binder, cut them up to stick in your planner—whatever works!

how to plan christmas stress-free

I hope you love this planner as much as I do. To download, click the button below—it will take you to a separate landing page, but don’t worry! Your planner is well within reach.

Thanks for reading & happy holidays! If you’d like more planners like this one, let me know in the comments!

How to Use Daily Notes to Stay Organized + Free Printable!

I love staying organized. And one of the ways I stay organized, day in and day out, is by using lists. Or, daily notes. In my bullet journal from work, I copy the same layout for my daily notes page every single day and use it to record my to do list, my schedule and meetings, as well as a few other tasks (like scheduling social media, posting blogs, etc.) 

Not everyone can use a bullet journal. It's just too much for some people. And it doesn't work for everybody. If you're one of those people, I've created a free daily notes printable that you can use instead--so you can test the waters of daily notes, see if it works for you, and then invest in starting a bullet journal. 

How do I use daily notes? Here's how: 

  • I write a to do list for every single day in the To Do section. This is where all my tasks go. If I end up needing more room, I start a list on the next page, but I try to prioritize what I list as an actual To Do. As well, any tasks that I need to get to, but don't have time for today, I put in the Remember for Tomorrow section. 
  • I track my water intake and FitBit steps in habits, as well as things like whether I've scheduled social media. 
  • In the schedule, I highlight the hours I work, add in my meetings and hourly deadlines, and then note Forrest's approximate bedtime. 
  • I use the Meals section to write my meal plan for the day. 
  • At the end of the day, I write three things I'm grateful for without fail. It's a good opportunity to reflect on my day and see what I've accomplished, as well as what has gone my way.